A cyber attack happens every 39 seconds, putting your website and business at risk of system downtime and revenue drop. And an average of 30,000 websites get hacked every single day, according to Forbes figures. This is the reason that today we have come up with how to protect your WordPress site with iThemes Security PRO.
If your website gets hacked, this translates to harming your reputation, dropping revenue, and losing customers’ and consumers’ trust. Because hackers can steal users’ confidential information, distribute malware to your users, and install malicious software.
In a report compiled by Google in March 2016, 50+ million website users have been warned about a website they’re accessing may contain malware or steal information.
Google blacklists an average of 20,000 websites for malware and 50,000 for phishing every week, as reported by Google (March 2016).
WordPress CMS powers nearly 40% of all the web, thus it’s a popular target for hackers. While WordPress core software is very secure but you need to follow best security practices and use one of the best security plugins to keep safe your WordPress website against hackers and malware.
Table of Contents
What is WordPress Security Plugin?
A WordPress security plugin is an auditing and monitoring software that improves your WordPress website’s security against hackers and malware. This keeps track of everything that happens on your WordPress websites such as file change detection, failed login attempts, and user activity logging.
There’re dozens of WordPress security plugins like iThemes Security PRO, Wordfence, Sucuri, Jetpack, and WPScan.
Why Do You Need A WordPress Security Plugin?
Using one of the best security plugins like iThemes Security PRO is the all-in-one solution to safeguard your WordPress site.
The security plugins offer you advanced features to enhance your website security. They allow you to change your WordPress admin login URL, prevent brute force attacks, run malware scans, detect file changes, keep records of user activity logging, keep safe your website databases, and much more,
We all know that iThemes Security is one of the best WordPress security plugins, so let’s talk about it in detail.
What is iThemes Security PRO?
iThemes Security PRO is a popular WordPress security plugin that protects and secures your WordPress website. This plugin is powered since 2014 by WordPress security experts and installed on more than 1 million websites.
iThemes Security PRO strengthens your user credentials, keeps track of suspicious activities, prevents brute force attacks, blocks bad bots, reduces spam, runs scans for malware, detects file changes, takes actions to keep safe your site, and much more.
The plugin utilizes 30 ways to protect your WordPress site and ensures that only you and other possible employees can enter into your WordPress admin dashboard.
This comes up with FREE and PRO (paid) versions, the FREE version delivers you the basic features while the PRO version lets you enjoy advanced security features.
If your budget is tight, then you should use the FREE version. However, if you need superior security, then the PRO version is the ideal solution that starts at $80 a year for one WordPress site.
Read More: iThemes Security PRO Review: Is It the Best Security Plugin?
How To Protect Your WordPress Site with iThemes Security PRO?

We have 14 actionable steps that you have to implement to protect your WordPress site against cyber attacks.
Quick Note: You have to install and activate the iThemes Security PRO plugin to implement the following steps.
#1. Enforce Strong Password
Your password is the first line of defense against unauthorized access to your WordPress admin dashboard. The stronger your password, the more secure your website will be.
Hackers guess your username and password to login into your WordPress admin dashboard until they succeed. Make sure you use the unique password for every account.
SpyCloud reported It’s estimated that 64% of people used the same password exposed in one breach for other accounts based on 1.7 billion username and password combinations (collected from the 755 leaked sources in 2021).
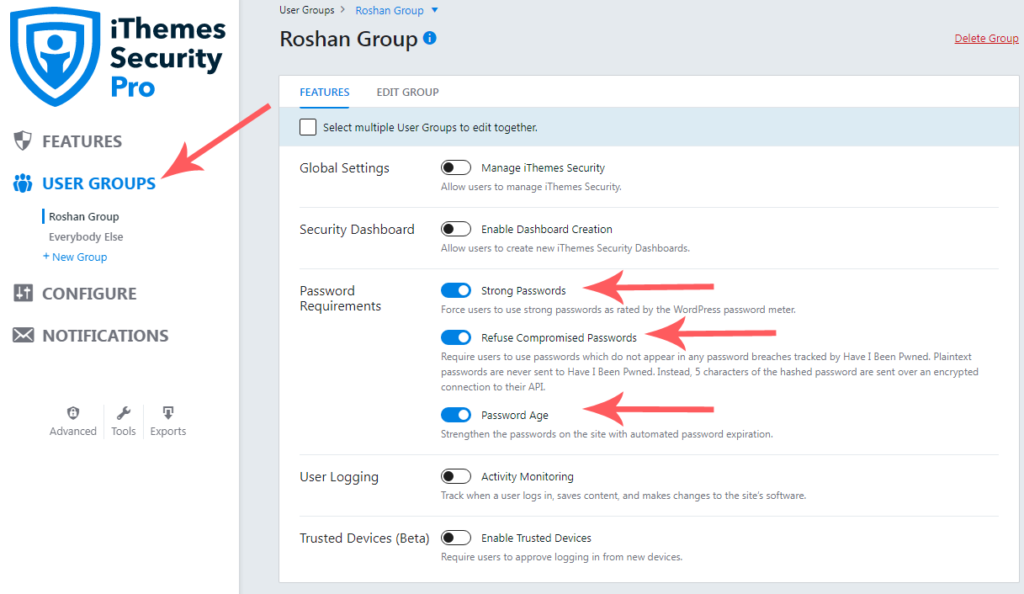
Follow this sequence, Log into Your WordPress Site >> Security (From Left Sidebar) >> Settings >> User Groups. Here you have to Select a User Group (from the left sidebar) that you want to configure the setting for.
Just enable the Strong Passwords, Refuse Compromised Passwords, and Password Age (after which the password will expire). The Password Age (or password expiration period) should be 30-60 days.
A strong password translates into a long password that contains numbers, special characters (% ^ @, *), and both upper and lower characters.
#2. Setup 2-Factor Authentication
The two-factor authentication adds an extra layer of security to your WordPress login by requiring additional unique code beyond the password and username to log in.
Without entering a unique code (sent to your email or received over the mobile authenticator apps) at the second factor, the username and password are no longer enough to log into your website.
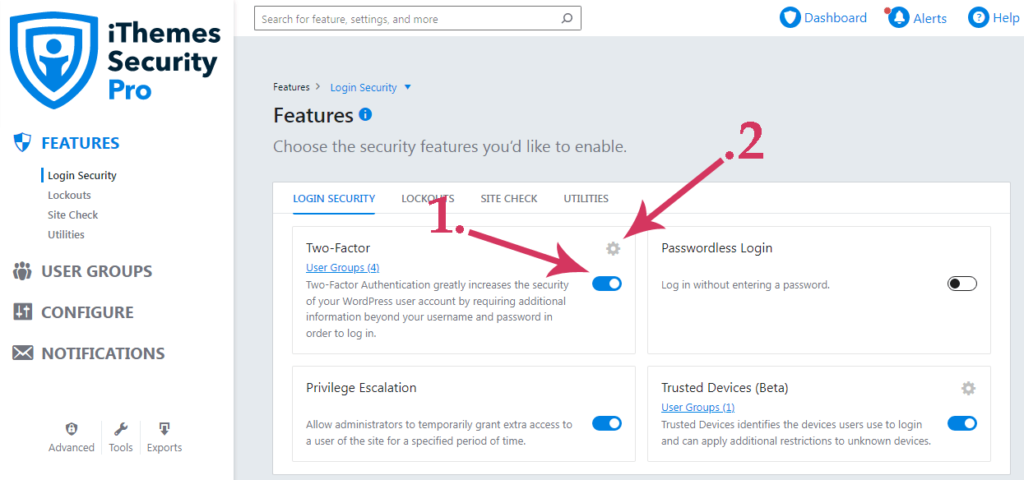
Thus, you must enable and set up the two-factor authentication by following this sequence.
Admin dashboard >> Security (from left sidebar menu) >> Settings >> Features >> LOGIN SECURITY >> Enable Two-Factor >> Click “Cogwheel” icon to Setup
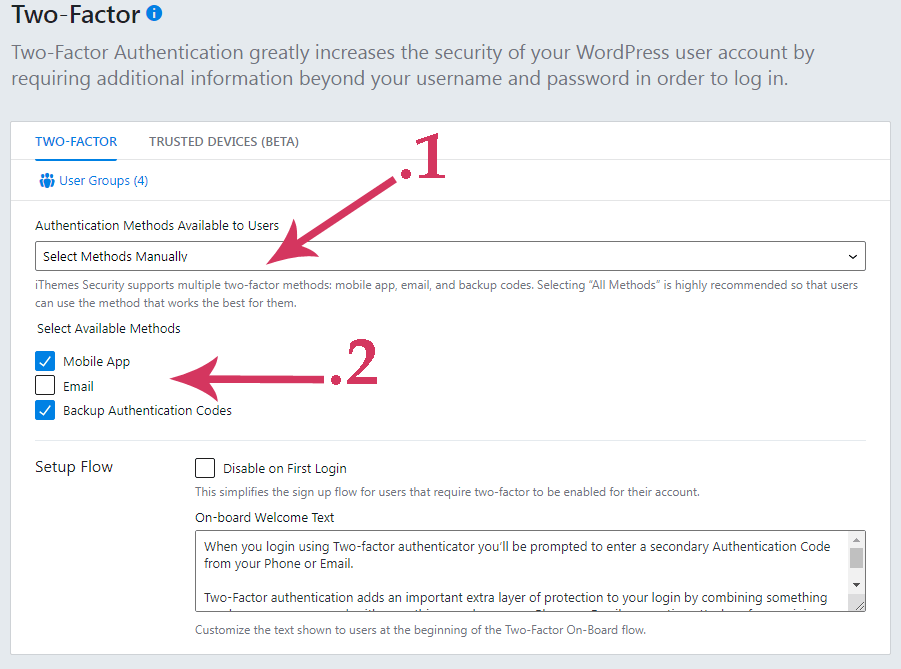
The available authentication methods are Mobile App, Email, and Backup Authentication Codes. The Mobile App is a better method, so mark the Mobile App and Backup Authentication Codes. This Works with Google Authenticator, Authy, FreeOTP, and Toopher mobile apps.
Once you then log into your website, you’ll have to scan QR Code with one of the mobile authenticator apps to receive codes.
#3. Hide WordPress Login Page
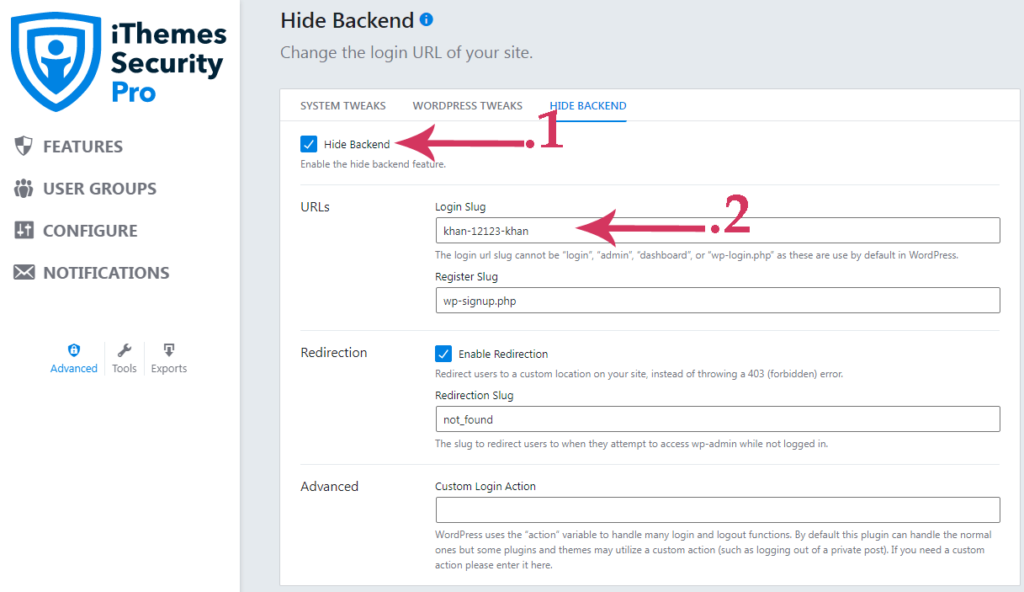
WordPress users and even bots know how to access the WordPress login page, simply they enter WP-admin or WP-login.php next to the URL of a website. This is the reason that you should hide the WordPress login page to reduce the number of hacking attacks.
Navigate to this sequence to hide the WordPress login page.
Admin dashboard >> Security (from left sidebar menu) >> Advanced >> HIDE BACKEND
So, mark the box of the Hide Backend option, then enter the login slug (like abc-12379-def) that you want to use for accessing the WordPress login page, and save it. Make sure to enter the login slug so that no one can guess.
#4. Make Schedule of Access to WordPress Admin Dashboard
You don’t work on your website 24 hours a day, that’s why you should make a schedule of access to the WordPress admin dashboard.
To put it simply, you should disable access to the WordPress admin dashboard for a specific period (usually when you don’t work on your website). So, no one even you can’t access the WordPress admin dashboard for the specified time while users can access the front-end of your site
You can do this with iThemes Security PRO but you still need to signup at iThemes Sync (which allows you to manage multiple WordPress websites all in one place).
Once you’ve signed up at iThemes Sync, in the Security setting tab of one of your site settings, you can find the Away Mode option to either turn on or off it.
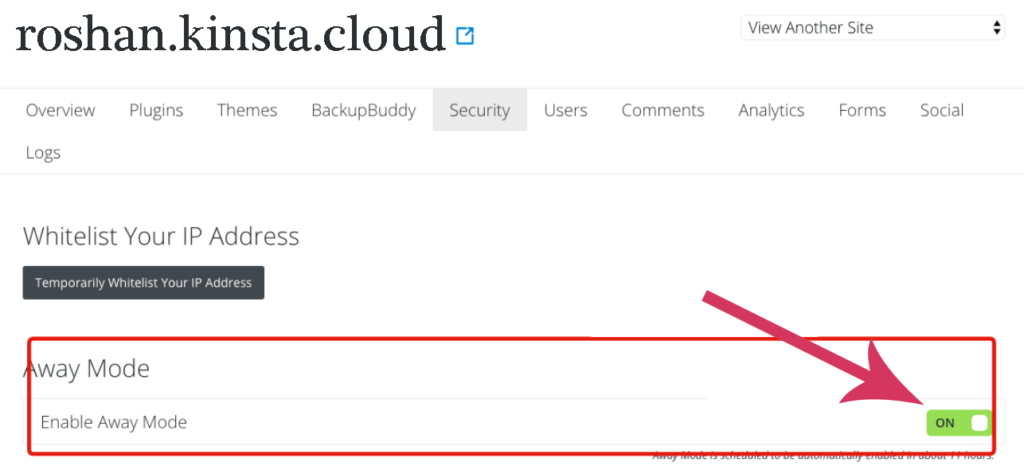
If you’ve turned on the Away Mode, no one can get into your site until you off it.
#5. Protect Your WordPress Site Against Brute Force Attacks
Mostly, hackers try an unlimited number of password combinations to log into your site until they succeed, this common method is called Brute Force Attack.
WordPress doesn’t provide a built-in solution to prevent brute force attacks, that’s where iThemes Security’s Brute Force Protection feature comes into play.
iThemes Security’s Brute Force Protection bans hosts and users after reaching a specified failed login attempts threshold. You can also enable to ban all the users that enter username admin to break into your site.
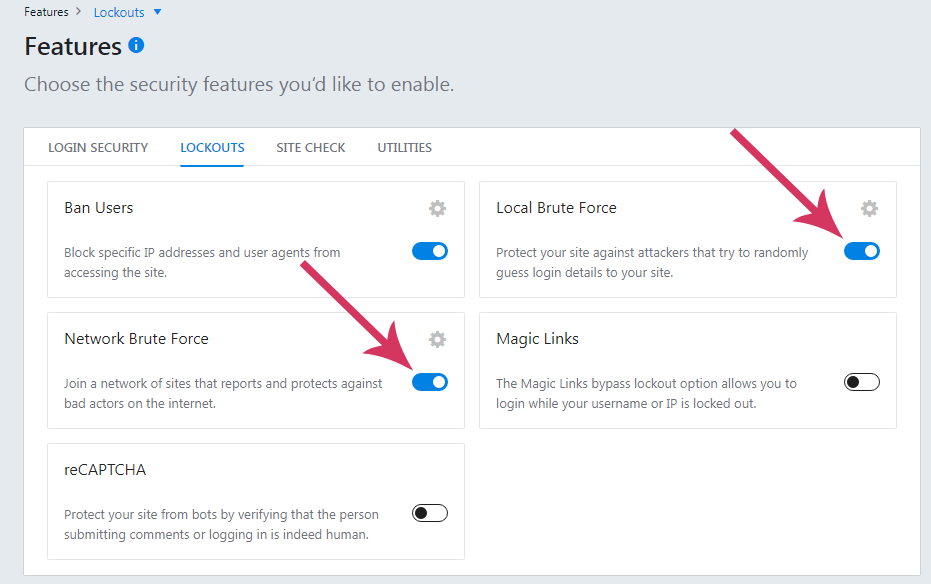
You should join Brute Force Network Protection which automatically blocks IPs reported as a problem by the network. So your WordPress website will be more protected against attackers on the internet.
Both features are enabled by default however if you want to configure them, you can follow this sequence Admin dashboard >> Security (from the left sidebar menu) >> Settings >> Features >> Lookouts
#6. Keep Track of File Changes
When someone else enters into your account, they change and edit your website files. So how do you know if a file is changed? You should enable the File Change Detection in the iThemes Security plugin.
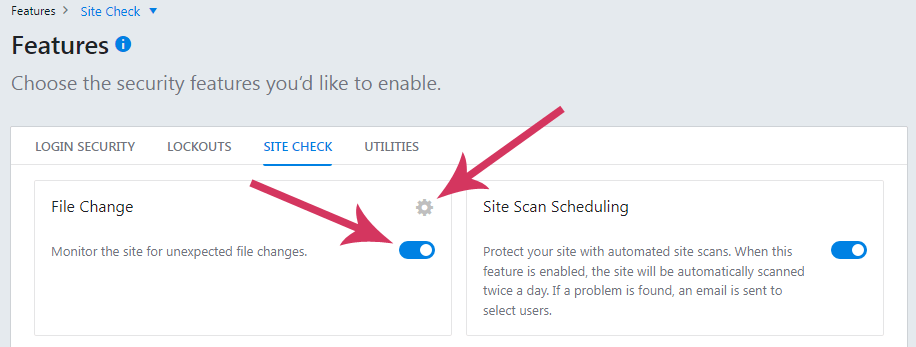
The File Change Detection feature scans your website files and then compares files to the last checked each day. Once they discover a file is changed, they will send you an alert email.
Navigate to this sequence to enable and configure the File Change Detection feature accordingly.
Admin dashboard >> Security (from left sidebar menu) >> Settings >> Features >> Site Check
#7. Ban Users
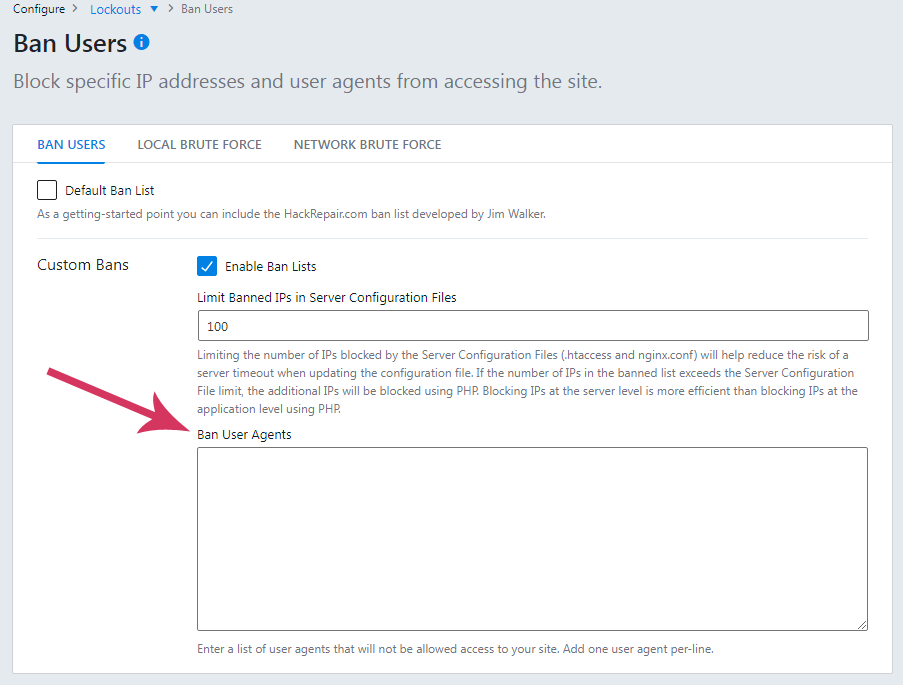
Once you discover that some user agents attack or harm your website, you can manually ban them. So then they can’t access your website.
Follow this sequence to ban the bad users.
Login to admin dashboard > Security (from left sidebar menu) > CONFIGURE > Lockouts > BAN USERS
Quick Note: You have to add a bad user’s IP per line in the ban user agents section.
#8. Scan Your WordPress Site Every Twice A Day
A vulnerability allows hackers to exploit your WordPress website. Not updating WordPress core, plugins and themes make vulnerable your WordPress website to attack.
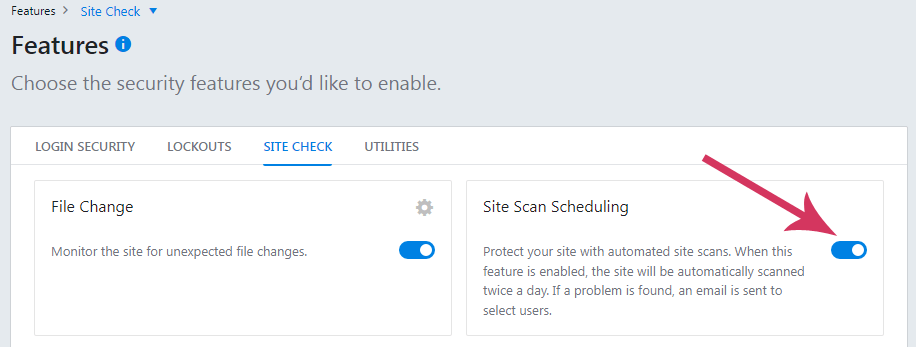
How to protect your WordPress site against known vulnerabilities? You just have to enable the iThemes Security PRO Site Scan feature and the rest of the work it will handle. Site Scan checks your WordPress website for known vulnerabilities such as WordPress core, plugins, and theme vulnerabilities.
Navigate to this sequence to enable Site Scan Scheduling.
Admin dashboard >> Security (from left sidebar menu) >> Settings >> Features >> Site Check >> Site Scan Scheduling
#9. Disable XML-RPC and File Editor
XML-RPC (stands for Extensible Markup Language Remote Procedure Call) allows users to access and modify content on their website through external devices.
You should disable both XML-RPC and File Editor for plugins and themes because it makes your WordPress website vulnerable to hack attacks like brute force attacks.
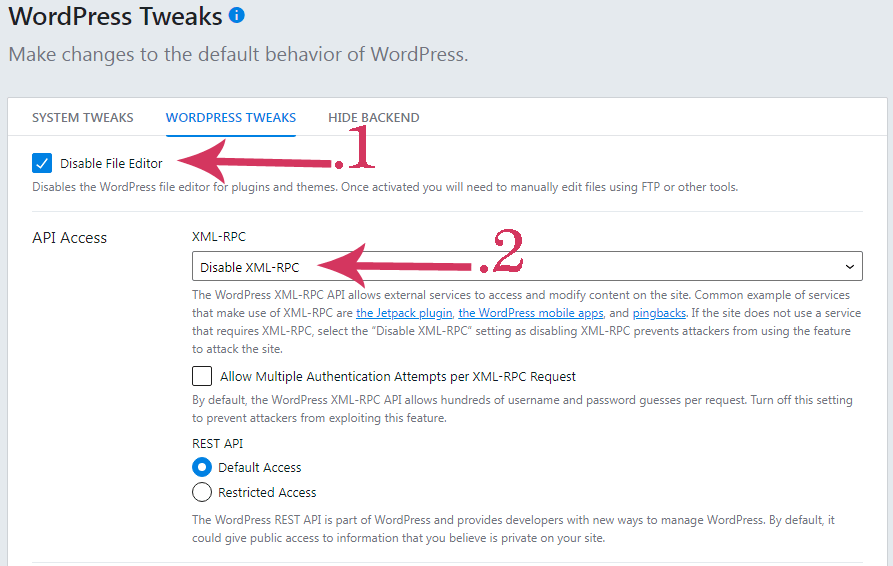
Follow the sequence to disable the XML-RPC and File Editor.
Admin dashboard >> Security (from left sidebar menu) >> Settings >> Advanced >> WordPress Tweeeks
Just mark the box of Disable File Editor to activate and also select the Disable XML-RPC from the XML-RPC dropdown options.
#10. Identify Trusted Devices
Make sure you’ve enabled the Trusted Devices feature that identifies your and other authorized users’ devices they use t log into your website.
Once the devices are recognized, then anyone logged into your WordPress website with an unrecognized device, the feature will limit their administrate-level capabilities. And iThemes Security PRO will send you an alert email that let you know that someone has logged into your website using unknown devices. So you can either approve or block it.
This will also protect your WordPress website against Session Hijacking attacks. Session Hijacking is a technique used by hackers to get control of a user’s browsing cookies, these cookies help hackers to access your WordPress login dashboard.
In the simplest sense, if an authorized user’s device changes during a session, the Trusted Devices feature will automatically lockout the user to prevent unauthorized activities.
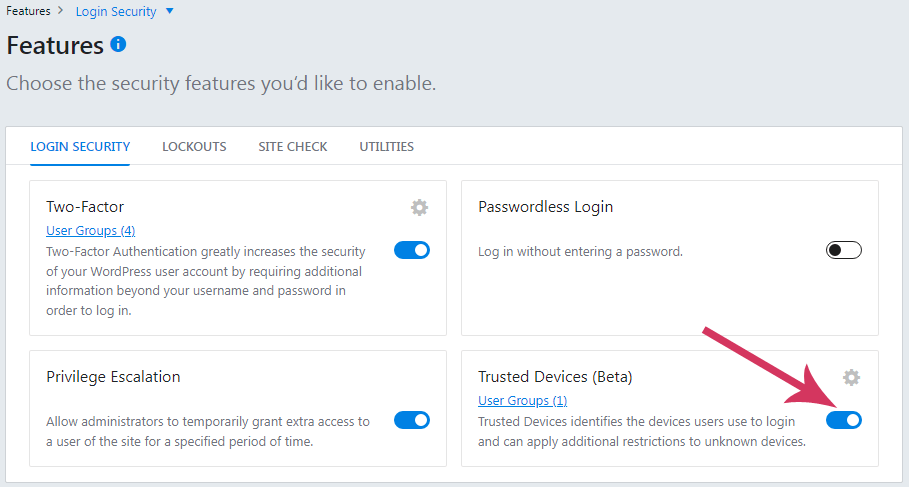
You just need to enable the Trusted Devices feature by following this sequence.
Admin dashboard >> Security (from left sidebar menu) >> Settings >> Features >> Login Security >> Trusted Devices (Beta)
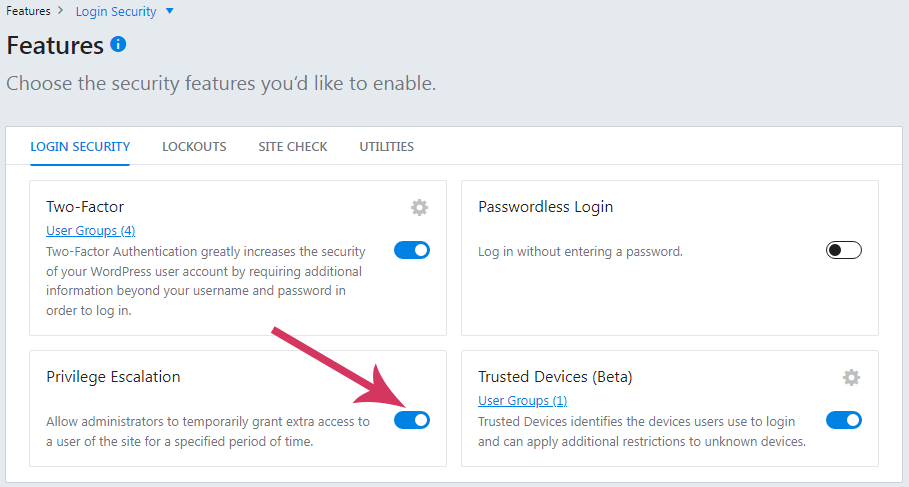
#11. Temporarily Grant Extra Access To A User
In case you need help from a developer or support agent to fix any issues that you encounter. Mostly, they request admin access to your website and you decide to grant them access.
Typically, you have two options to grant them admin access either you share your user’s credentials or create a new user for support tech, so both are inconvenient and fall your website’s security at risk.
That’s where the Privilege Escalation feature comes into play. This makes it easier and safer to create universal user access for any outside developer or support agent that only lasts for 24 hours.
Follow the series to enable the Privilege Escalation feature to securely grant access to a user.
#12. reCAPTCHA
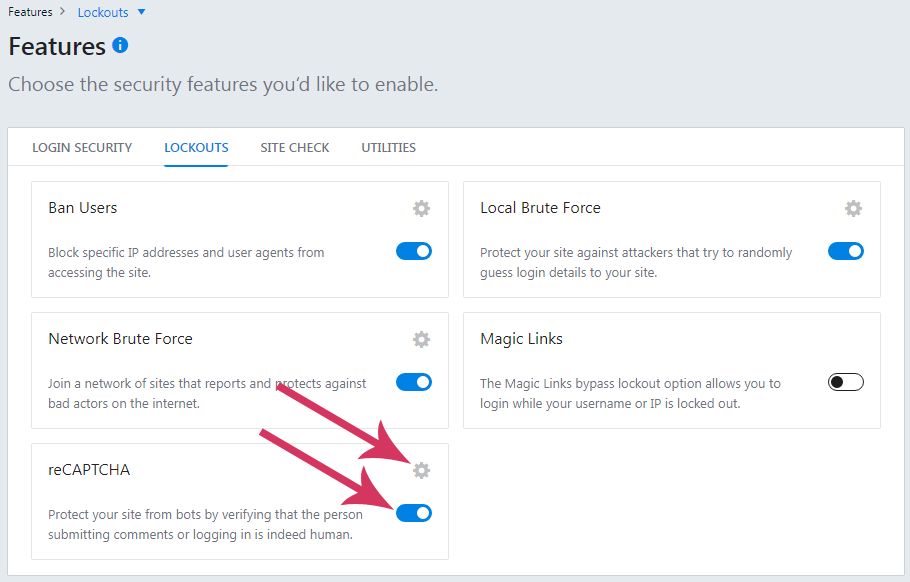
reCAPTCHA protects your website against spam and fraud. It prevents scammers from posting unwanted comments and sending malicious messages while letting real users perform targeted actions with ease. This can be used on contact forms, comments, login, password recovery, and others.
Navigate to this sequence to enable reCAPTCHA for login, new user registration, reset the password, and comments. iThemes Security PRO plugin allows you to choose from different types such as reCAPTCHA v3, reCAPTCHA v2, and invisible reCAPTCHA.
Admin dashboard >> Security (from left sidebar menu) >> Settings >> Features >> Lookouts >> reCAPTCHA
Once you’ve activated the reCAPTCHA feature, click the cogwheel icon to configure accordingly.
#13. Version Management
Keeping outdated WordPress core, plugins and themes translate to leaving open your WordPress website open to attacks. Because developers release updates that include patches and fixes to resolve known issues and strengthen your website’s security.
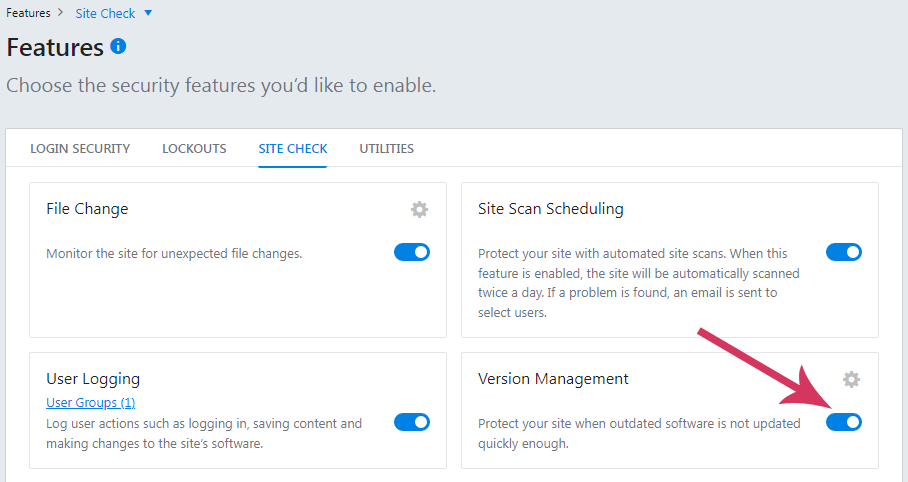
If you can’t update them manually, you should enable the Version Management feature of iThemes Security PRO. This will keep up-to-date your WordPress core, plugins, and themes to protect your website against hackers.
Follow the sequence to enable the Version Management feature.
Admin dashboard >> Security (from left sidebar menu) >> Settings >> Features >> Site Check >> Version Management
#14. Database Backups
If something happens wrong which breaks down your current website, you need a website backup file to restore your website to its original state.
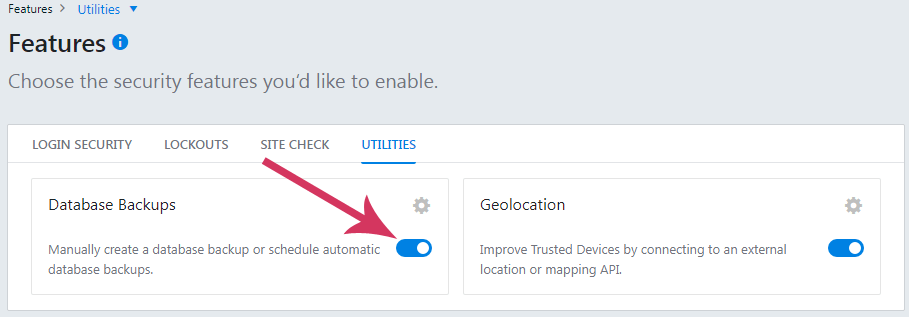
iThemes Security PRO allows you to create manually or schedule automatic database backups. Quite Impressive.
Navigate to Admin dashboard >> Security (from left sidebar menu) >> Settings >> Features >> Utilities >> Database Backups. and enable it.
Read More: How To Backup Your WordPress Website?
So I hope you’ve found this article helpful on how to protect your WordPress site against hackers, malware, and known vulnerabilities.

