Want to disable XML-RPC in WordPress to secure your website, then you’ve come to the right place.
Updating your WordPress website through external applications is possible when XML-RPC is enabled.
XML-RPC is a set of rules that allow users to connect with their WordPress websites using third-party applications, tools, and services.
The biggest downside is that it creates vulnerabilities in your WordPress website which hackers can exploit. And now it has been replaced by the WordPress REST API, which does a much better job.
Hence, disabling XML-RPC in WordPress is one of the best security practices to follow to protect your WordPress website from the most common attacks.
Before getting started, it’s important to know what XML-RPC is and how it works.
Table of Contents
What is XML-RPC?
XML-RPC is a WordPress feature that enables third-party applications to connect and interact with a WordPress website.
It means users can manage and post on their WordPress websites using WordPress mobile apps or remote blogging apps.
This feature should be enabled when you want to publish content on your WordPress website remotely. But keep in mind when this feature is enabled, your site is vulnerable to attacks.
XML-RPC adds an extra entry point to your WordPress website that needs to be locked.
Why Do You Need to Disable XML-RPC in WordPress?
XML-RPC.php file comes with every WordPress installation by default because of backward compatibility. The team behind WordPress wants website owners who are unwilling or can’t update their WordPress version to 4.4 or higher to still be able to do everything they want on their WordPress website.
The most common types of attacks that exploit XML-RPC.php file are as follows.
#1. DDoS Attacks via Pingbacks
Pingbacks are the notifications that appear in your site’s comment section when someone has linked back to your post from one of their posts. This can drive traffic to your website and improve your search engine ranking.
Unfortunately, pingbacks have a dark side. When XML-RPC is enabled, attackers can mount DDoS attacks by exploiting it to send a huge number of pingbacks to your website quickly.
#2. Brute Force Attacks
Many WordPress brute force attacks are happened via wp-login.php however now they are evolving the XML-RPC wp.getUsersBlogs method to guess as many passwords as they can.
This hacking technique is faster and harder to detect, thus XML-RPC is a prime target for attackers. This i why we recommend disabling XML-RPC to protect your WordPress website.
Read More: How to Prevent Brute Force Attacks on WordPress Site? (Guides)
When to Keep XML-RPC Enabled?
Keeping XML-RPC enabled is required in a few scenarios as listed below.
- You can’t update your WordPress version to 4.4 or higher for some reasons, which means you don’t have access to the REST API.
- You use software that can’t access the REST API to communicate with your WordPress website.
- Your WordPress site is integrated with third-party apps that rely on XML-RPC.
Except for these conditions, you should disable XML-RPC in WordPress because it introduces security vulnerabilities to your website.
How to Disable XML-RPC in WordPress Website?
You can easily disable XML-RPC by using one of the aforementioned methods.
#1. How to Disable XML-RPC in WordPress Using A Plugin?
There’re many plugins that do this job. But keep in mind that just disabling it will not completely secure your WordPress site. Therefore, you should install an all-in-one best WordPress security plugin to implement other best security practices.
iThemes Security is the all-in-one best WordPress security plugin that protects your site using 30+ ways including disabling XML-RPC. This makes it easiest to keep safe your WordPress website against common attacks within a few minutes.
Read More: iThemes Security PRO Review: Is It the Best Security Plugin?
Quick Note: Installing more plugins could slow down your website and make it vulnerable. Therefore, you should use all-in-one plugins (one plugin for several functionalities) to keep your website lightweight and improve its security.
Let’s go ahead to disable XML-RPC in WordPress.
Install and activate the iThemes Security plugin and then navigate to Security ➜ Settings ➜ Advanced ➜ WordPress Tweaks as shown in the below image.
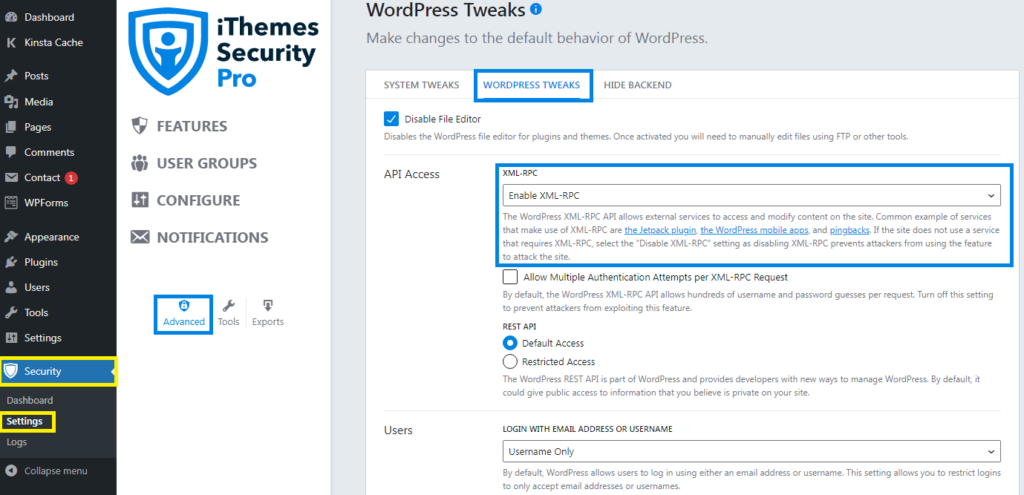
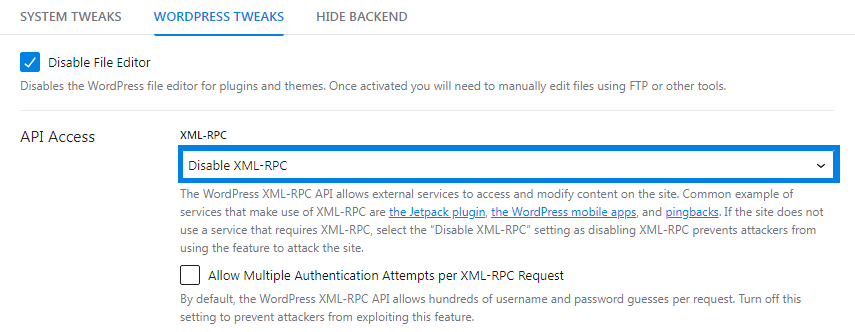
Next, select “Disable XML-RPC” from the dropdown list, and click the “Save” button to make changes.
However, if you want to only stop pingbacks and allow remote access, then select “Disable Pingbacks“.
#2. How to Disable XML-RPC in WordPress Using a Code?
WordPress core enables you a filter to manually add the following code to your website’s functions.php file to disable XML-RPC.
add_filter( 'xmlrpc_enabled', '__return_false' );However, if you’re a beginner, then we don’t recommend directly editing your WordPress core files because it can break down your website if not done correctly. Therefore, we’ll be using the WPCode plugin to add this code snippet because it’s the safest and easiest way to add code to your site.
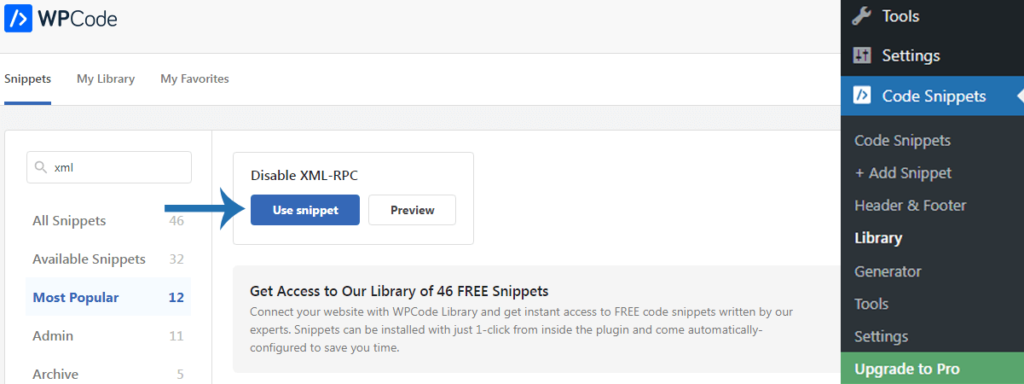
First, install the free WPCode plugin, then visit Code Snippets ➜ Add Snippet, and search for XML.
WPCode’s snippet library includes a code to disable XML-RPC, you just have to click the “Use snippet” button.
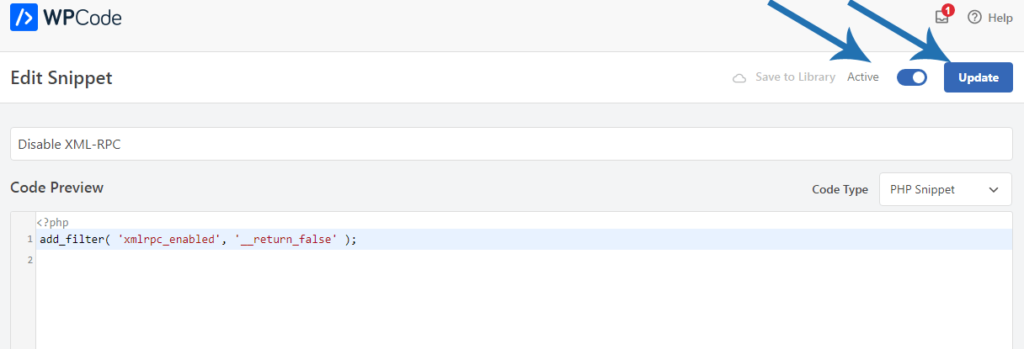
After that, switch the “Activate” toggle on.
Don’t forget to click the “Update” button to activate the code snippet and disable XML-RPC.
#3. How to Disable WordPress XML-RPC with .htaccess
If you want to allow remote access for you and your team while restricting everyone else, you can do this by disabling XML-RPC with the .htaccess file.
You can access and edit the .htaccess file through cPanel (HPanel) or an FTP client. In this case, we’ll use HPanel (Hostinger hosting control panel).
Log into your web hosting provider and go to File Manager ➜ public_html (folder). Within the folder, you’ll find the .htaccess file. Right-click on the .htaccess file and then hit the “Edit” button.
Next, add the following code to the .htaccess file.
# Block WordPress xmlrpc.php requests
<Files xmlrpc.php>
order deny,allow
 deny from all
allow from 123.123.123.123
</Files>
Make sure to replace 123.123.123.123 with an IP address for anyone you want to allow remote access.
If you want to disable XML-RPC altogether, then remove allow from 123.123.123.123 from it and click the “Save” button to make changes.
Congrats! You’ve successfully disabled XML-RPC in WordPress.
How to Check if XML-RPC is Enabled or Disabled?
You’ll want to identify whether XML-RPC is successfully disabled on your website.
To check if XML-RPC is disabled, install the WordPress mobile app on your device. Next, open it on your phone and click on the “Enter your existing site address” button.
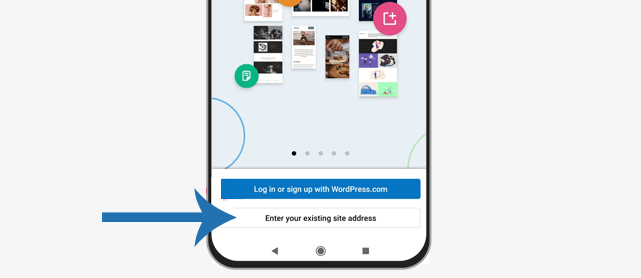
On the next screen, enter your website address and click the “Continue” button.
After that, provide the same username and password that you use to log into your website.
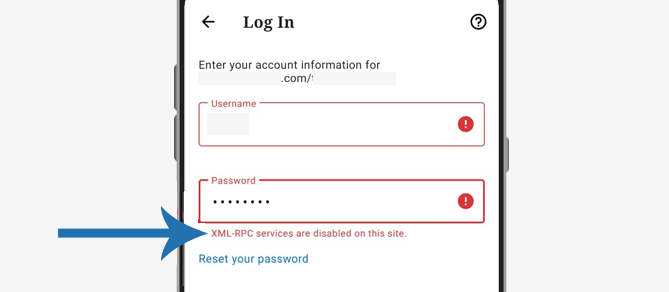
Now you see the error message that XML-RPC is disabled on your site.
Conclusion
XML-RPC is a WordPress specification that allows users to manage their WordPress websites using third-party apps.
It makes your website vulnerable. Therefore, you need to disable XML-RPC in WordPress to stop brute force attacks and DDoS attacks.
Disabling XML-RPC will lock one more door to keep safe your website from security threats.
We hope this blog post helped you learn how to disable XML-RPC in WordPress. If you liked this post, subscribe to our email newsletter for quality content.


