Want to learn how to build an online store with WordPress in less than 1 hour? then you have come to the right place.
Starting an online store is cheaper than maintaining a physical store because an online store requires only domain and hosting while a physical store has rent or buying space expenses for your business to set up.
According to Oberlo, the number of online shoppers was 2.14 billion in 2021 which made nearly 27.6% of the world population. And this number is set to continue growing.
Additionally, an online store allows you to sell your products and services to people from all over the world. This helps you to increase your sales potential and brand reputation.
So today we’ve come up with our detailed and step-by-step guide to help you launch your online store using WordPress in less than 1 hour.
What You’ll Learn Here?
Our comprehensive blog covers the following topics.
- What do you need for launching an online store?
- Why you should create your online store with WordPress?
- How to build an online store with WordPress in less than one hour?
- How to choose the best WooCommerce hosting?
- How to set up WordPress?
- How to set up the WooCommerce plugin?
- How to add products to your online store?
- How to install the best WooCommerce theme?
- How to add more features to your online store?
Let’s get started.
Table of Contents
What You Will Need to Build an Online Store?
Building your online store only requires the following 3 things.
- Domain Name: This will be the name of your website (online store) that comes after www. in a web address. Your customers will then enter your domain name in the address bar to visit your online store.
- Hosting: This helps you to create your online store and make it accessible on the World Wide Web.
- Time: Creating and optimizing your online store also requires time.
Why You Should Build Your Online Store with WordPress?
When you start an eCommerce business, the 3 options come to mind for choosing an eCommerce platform
1st Option: Selling Your Products with an Existing Marketplace
Some marketplaces such as Amazon and eBay allow third-party sellers to sell their products. The benefits of selling on a marketplace are its wider reach, customer trust, and management of shipping and delivery.
But keep in mind selling with an existing marketplace faces you significant problems like high competition, delays in payments, high commissions, and no access to your customers’ data.
2nd Option: Launching your online store using Shopify
The second option is Shopify, Shopify is an eCommerce platform that helps you to launch your online store with ease. The platform takes care of the technical aspects such as hosting, security, and caching.
The Shopify Basic plan starts at $19 a month that includes an online store, unlimited products, free SSL certificates, gift cards, sales channels, basic reports, 2 staff accounts, up to 4 inventory locations, 24/7 support, and much more.
In addition to plan subscription, Shopify charges a fee of 2.9% + $0.30 per transaction for all online purchases. However, if you use any other payment gateway than Shopify payments, a 2% fee will be charged on every transaction. So the payment processing fees are high if you use a third-party payment gateway.
3rd Option: Building your online store with WordPress and WooCommerce
Many users prefer to build their online stores with WordPress and WooCommerce because of the flexibility they offer.
WooCommerce is the best eCommerce plugin built on top of WordPress and installed on over 5 million websites. The plugin turns WordPress websites into online stores that will have a product catalog, a single product page, a shopping cart, and checkout options.
According to BuiltWith eCommerce Usage, every 1 in 4 online stores is built with WooCommerce. The WooCommerce plugin is free but you’ll need a domain name and hosting account, so it’s cheaper. Hence, we will launch our online store with WordPress and WooCommerce.
Let’s go ahead.
How to Build an Online Store with WordPress in Less than 1 Hour?
We have 7 actionable steps to implement to build an online store with WordPress and WooCommerce.
#1. Purchase Hosting and Register Your Desired Domain
We recommend Nexcess managed WooCommerce hosting which is designed to deliver better customer experience, improved performance, enhanced security, and optimal customer support.
The entire tech stack of Nexcess managed WooCommerce hosting is designed for WooCommerce. This translates to flexibility and compatibility with WooCommerce. This also comes with advanced eCommerce-specific features to build your online store.
Nexcess managed WooCommerce hosting includes all the essential plus advanced features such as at least 500 orders an hour capability, visual regression, staging site, iThemes Security PRO, daily backups, SSL certificates, built-in CDN, Elasticsearch, image compression, Sales Performance Monitor, Plugin Performance Monitor, automated testing, Beaver Page Builder, Astra PRO, Qubely Pro, and Kadence Starter Templates.
Read More: Nexcess Managed WooCommerce Hosting Review: Is It Ideal?
Let’s purchase the Nexcess managed WooCommerce hosting.
Click on the below button to visit Nexcess managed WooCommerce hosting and save 30% OFF for the first 4 months.
Once you’ve visited the page, scroll down to the plans, and choose a plan that fits your needs. Let’s say the STARTER plan if you’re a beginner.
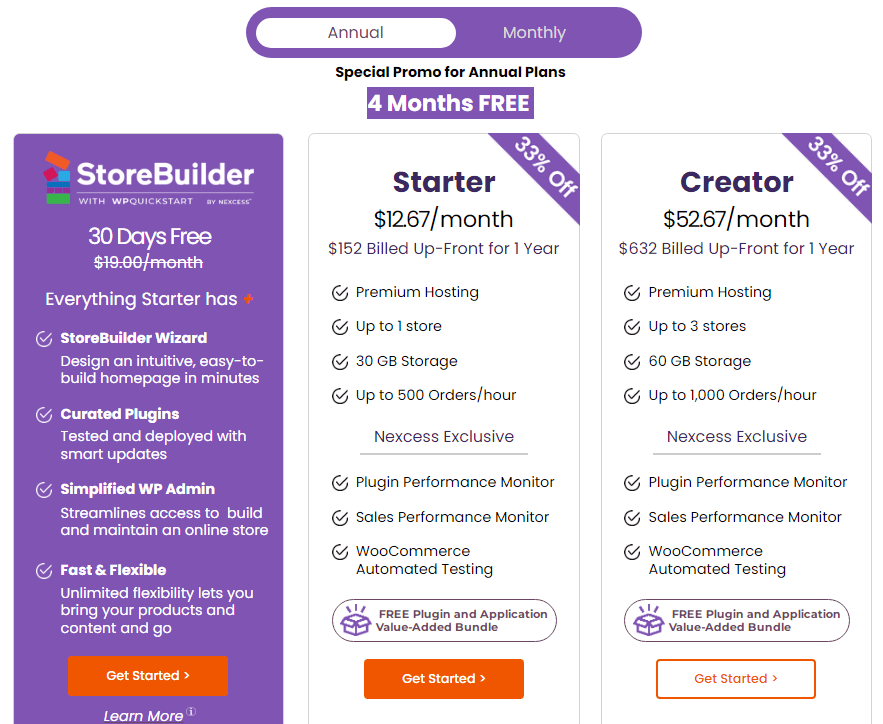
Quick Note: If you want to save more, pay annually as it gets 4 months for free.
Just click on the Get Started > button in the plan box. This will bring you to the shopping page where you have to enter your email, password, billing information, and payment information to confirm your order.
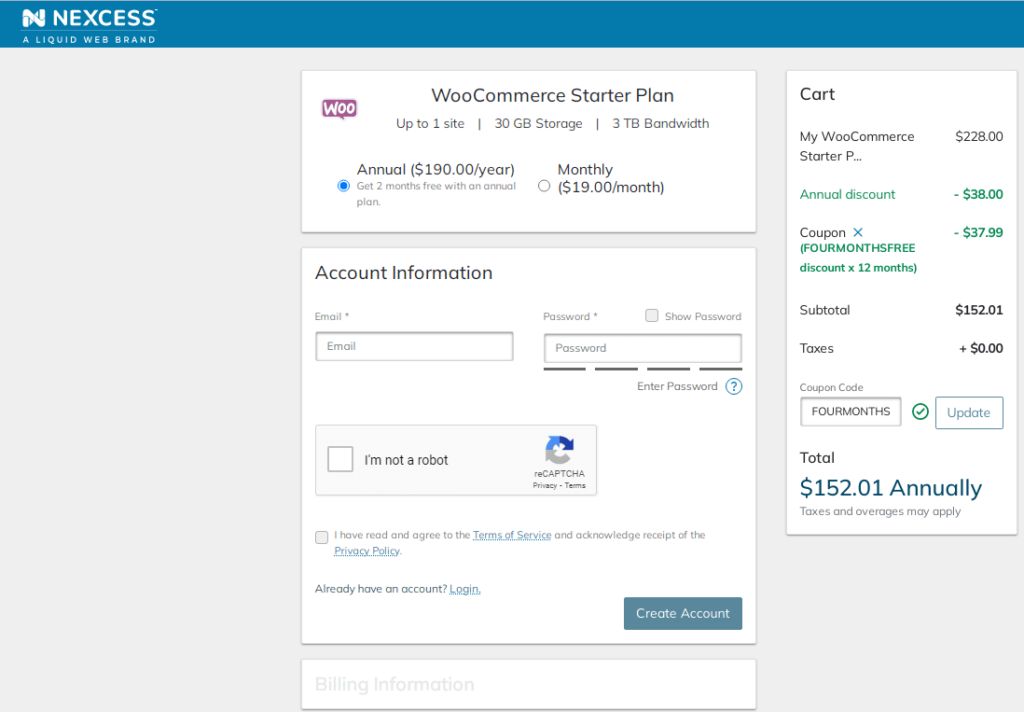
Once you’ve successfully placed an order, you’ll be logged in to Nexcess Client Portal. Nexcess Client Portal is the control panel where you can manage everything related to your website.
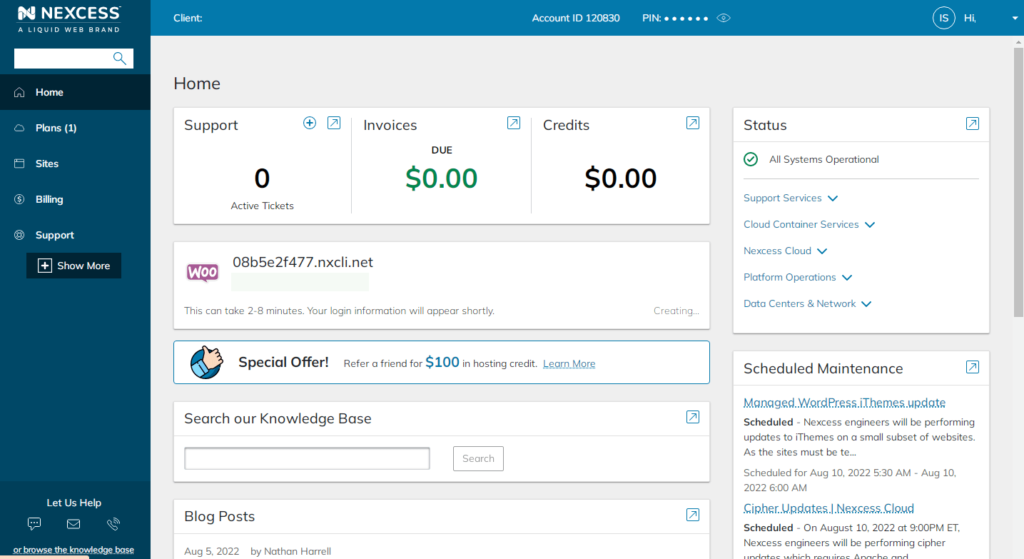
Nexcess will automatically install WordPress in a few minutes and then it will appear your username and password to log in to your WordPress website.
But wait a moment; a temporary domain has been connected to your hosting account by default, so you have to change it to your custom domain name.
Nexcess offers domain registration service that makes it easier to connect your domain and hosting. However, if you prefer to register your domain name on popular domain registrars like Namecheap or Godaddy, then add the following nameservers to your domain name.
- ns1.nexcess.net
- ns2.nexcess.net
- ns3.nexcess.net
- ns4.nexcess.net
Once you’ve added them, log in to the Nexcess Client Portal (dashboard) and navigate to the DNS tab from the left sidebar. Click on the Add DNS Zone button and then enter the domain name you pointing to.

Once you’ve entered the correct domain, a notification will appear that let you know your DNS zone will be added soon. It takes a short time to point your domain name.
Go to the Home tab and you’ll see the username and password for your WordPress website. Just click on the Enter WordPress button and then enter your username and password to log in to your WordPress site.

Congrats! you’ve completed the first step.
#2. Setting Up WordPress
Now your WordPress website is almost ready to use. There are a few important settings that you should make.
Log in to your WordPress website and follow Settings > General to enter your site title and description.

Enable SSL Certificate
The SSL certificate is pre-installed on your website with Nexcess managed hosting. But if your website is hosted on another web host, make sure to check whether an SSL certificate is installed on your website or not.
SSL certificate is required for every website especially eCommerce websites because they deal with customers’ sensitive data like payment information.
#3. Set UP WooCommerce
WooCommerce is the #1 WordPress eCommerce plugin that turns your website into a fully functional eCommerce site (online store). This plugin allows you to create your desired eCommerce website and gives you full control over your data.
The WooCommerce plugin comes pre-installed with Nexcess WooCommerce hosting. But if your web host doesn’t come with that, you can simply follow these steps to install WooCommerce on your own.
Go to Plugins > Add New to install the plugin. Enter WooCommerce in the search bar, wait a moment, and click the Install Now button next to the WooCommerce plugin listing. Then wait a few moments to appear the Activate button and finally click it.

Once you’ve activated the plugin, it will bring you to a setup wizard containing 5 steps.
Step 1: Enter Your Store Details
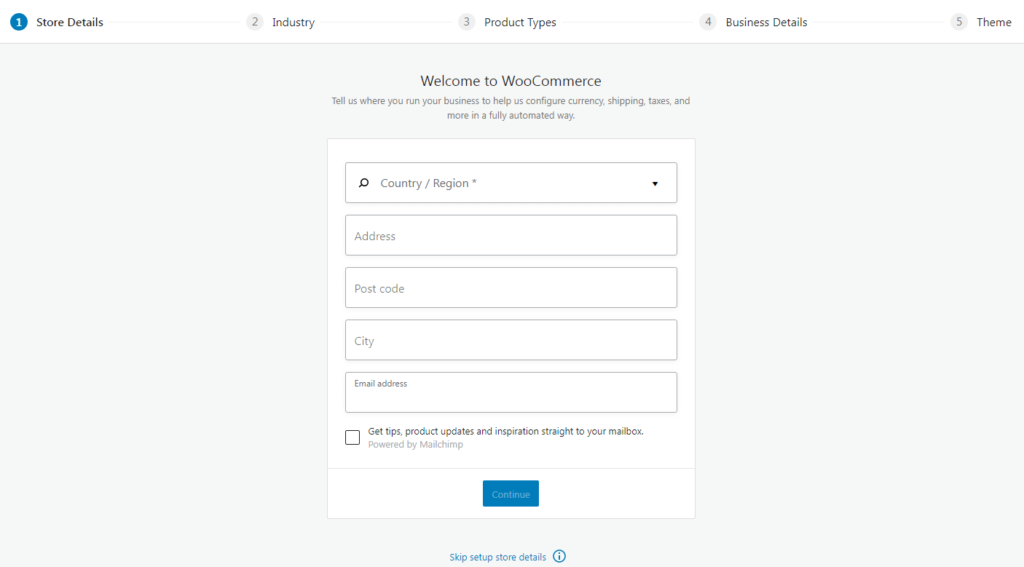
In the first step, enter the country and city name along with its address and postcode. This helps them configure currency, shipping, taxes, and more in a fully automated way.
Click on the Continue button to go on.
Step #2. Industry
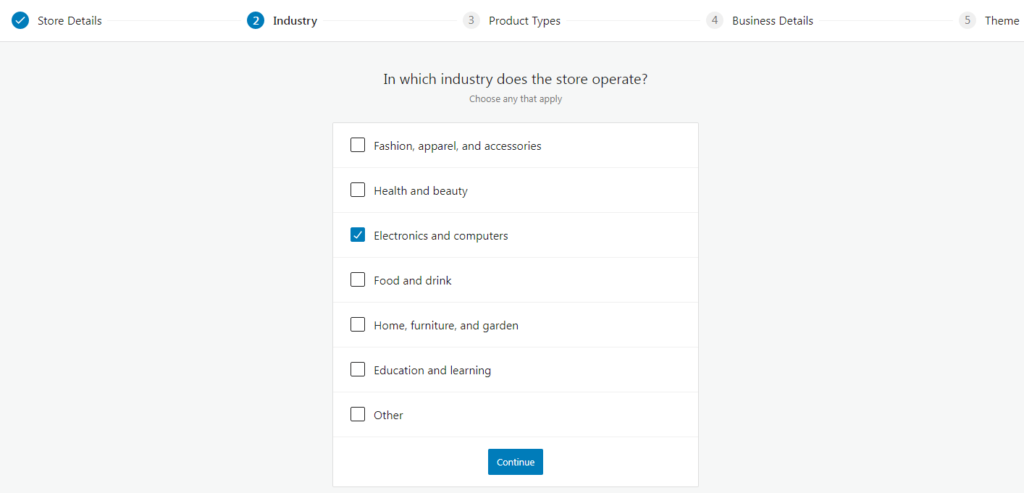
Choose an industry in which your online store operates.
Click on the Continue button to move on.
Step #3. Products
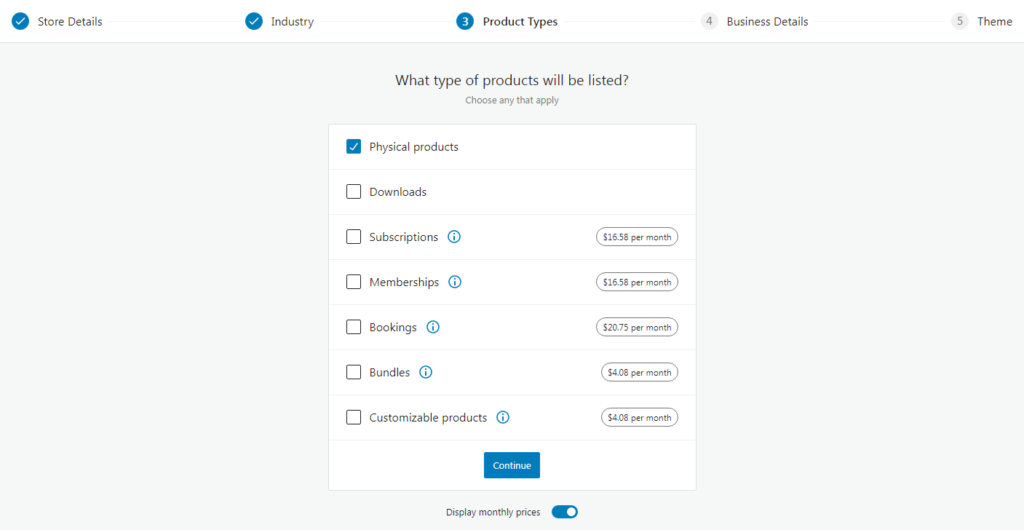
This step allows you to choose which type of products you’ll sell. You can sell physical products, downloads, subscriptions, membership, bookings, bundles, and customizable products.
Let’s dig dive into them.
- Physical Products: You can sell physical goods but you’ll also need to add at least one shipping or local pickup option to your online store.
- Downloads: You can sell digital downloadable files such as eBooks, graphic templates, or MP3s.
- Subscriptions: If you want to get paid for your services and products on a weekly, monthly, or annual basis, you need an extension called WooCommerce Subscriptions.
- Memberships: If you want to restrict your content and make it accessible to paid customers, it requires an extension called WooCommerce Memberships.
- Bookings: If you intend to sell products that require appointments or reservations, you need an extension called WooCommerce Bookings.
- Bundles: If you want to make a group of several products and sell them as a single unit for one price, you need an extension called Product Bundles. This allows you to offer personalized product bundles, bulk discount packages, and assembled products.
- Customizable products: If you want to offer add-ons like gift wrapping, special messages, or other special options for your products, use an extension called Product Add-Ons.
Step #4. Business Details
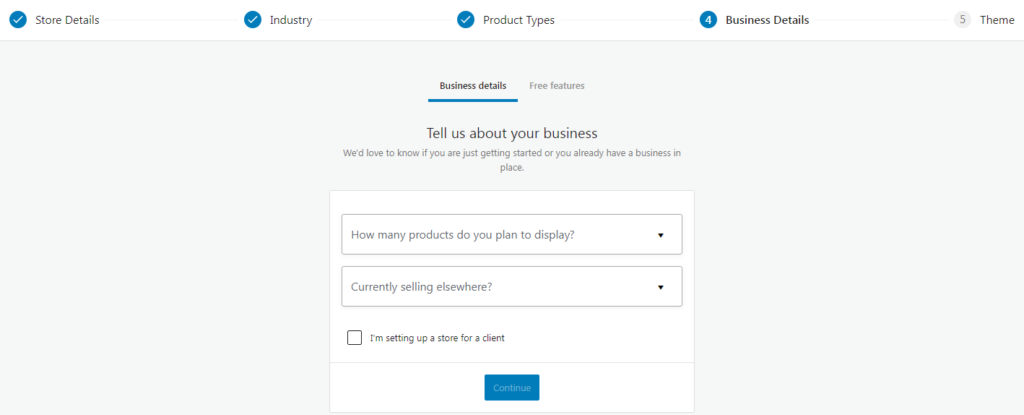
In this step, enter how many products you plan to list in your store and it also asks do you selling elsewhere.
Once you click on the Continue button, it will bring you the Free Feature options. This allows you to add recommended business plugins such as Jetpack, MailPoet, Google Listings and Ads, and Facebook for WooCommerce to your website. I will leave you them up to you whether you need them or not.
Once you have set up everything according to your needs, click on the Continue button to go ahead.
Step #5. Theme
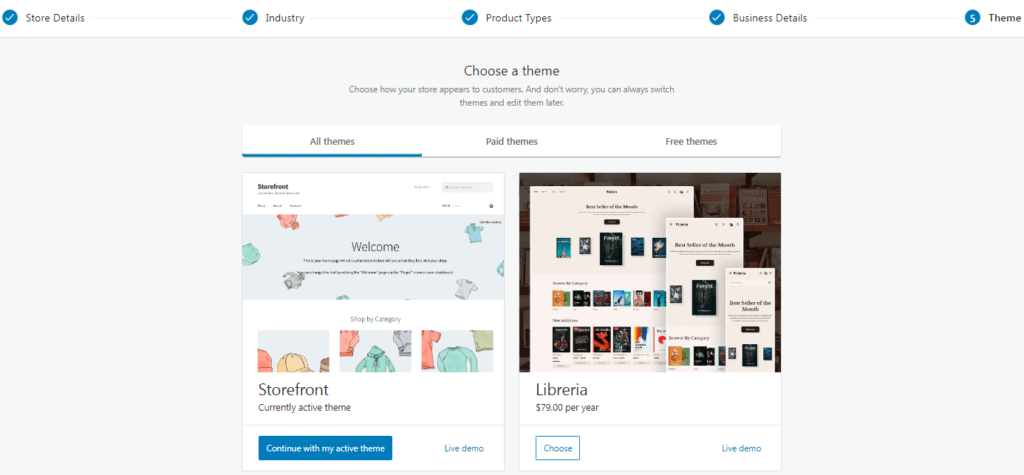
This step allows you to choose a theme for your online store. But for now, just click on the continue with my activate theme. Later, I’ll show you how to install the #1 WordPress theme for WooCommerce – Astra.
Now let’s configure the WooCommerce settings.
#4. Configure WooCommerce Settings
The WooCommerce setup wizard gets your online store up and running. But there are more settings to configure such as payments, shipping, and taxes.
Setting Up Payments
Setting up payment methods translates to accepting and processing payments using multiple options like PayPal, debit cards, credit cards, and even alternative payment options.
Follow the WooCommerce > Settings > Payments tab to set up payment methods.
The Payments tab allows you to enable and set up the installed payment methods such as PayPal, cash on delivery, check payments, and direct bank transfers.
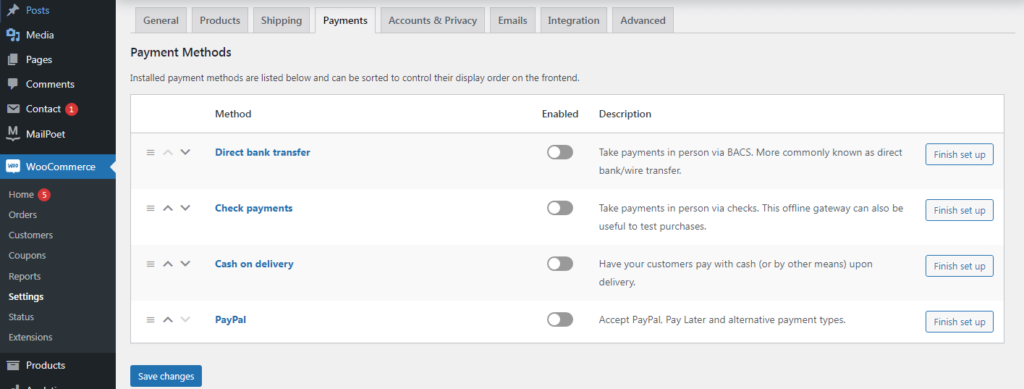
Activating PayPal payments will allow you to securely accept PayPal, Venmo, Pay Later, and all major credit & debit cards with fraud protection.
To set up the PayPal payment method, click on the Finish Set Up button next to the PayPal listing. This will bring you to another page where you have to configure the settings.
The default setting is pretty good, you have to add your PayPal email to connect.
Click on the Activate PayPal button at the bottom of the page, it will open another window and asks for your PayPal email address to start collecting payments.
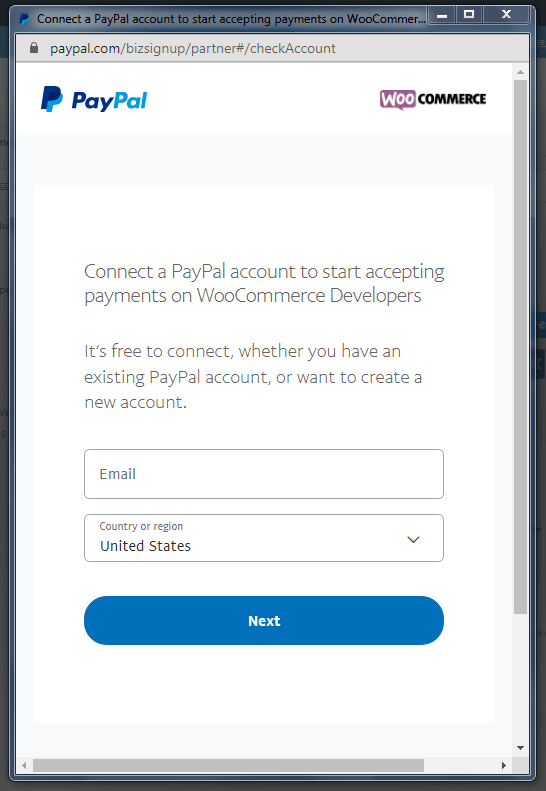
Once you’ve entered your PayPal email, click on the Next button. This will redirect you to a new page where you have to choose whether your account is personal or business. So choose one of them based on your account type.
Congrats! You’ve done it.
You can also add other payment methods to your store using extensions and plugins.
Adding Shipping Zones and Methods
To add more shipping zones and methods along with customizing them, go to the Shipping tab (accessed by WooCommerce > Settings > Shipping).
If you would like to add a new shipping zone, click on the Add Shipping Zone button. Then, it will ask for the zone name (for your reference), zone regions, and shipping methods.
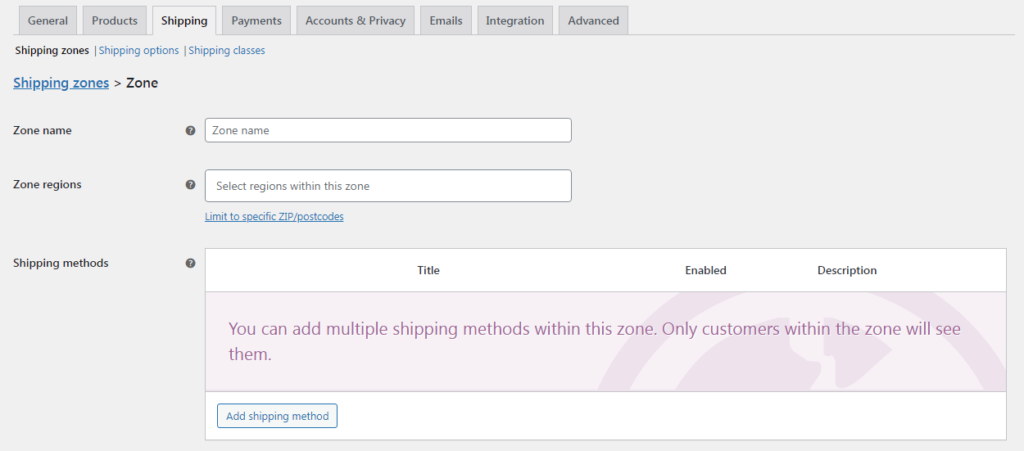
For the shipping methods, you can add multiple methods as listed below.
- Flat Rate: This lets you charge a fixed rate for shipping.
- Free Shipping: This can be activated with coupons and minimum spending.
- Local Pickup: This method allows customers to pick up orders themselves. Keep in mind when using this method, store base taxes will apply regardless of customer address.
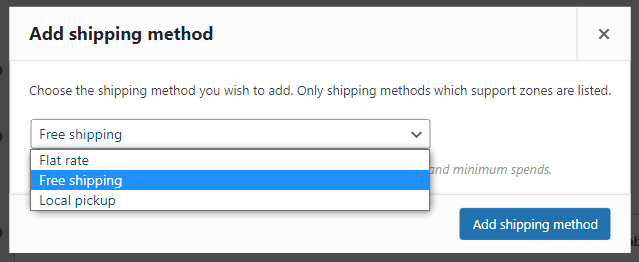
Once you’ve added a shipping method, click on the Edit button next to your added shipping method.

Configure the shipping method in the expanded menu.

Once you’ve entered the correct information, don’t forget to click the Save Changes button.
Enabling Taxes
Setting up and calculating taxes requires to be enabled first. Navigate to WooCommerce > Settings > General, scroll down to the General Options, check the Enable tax rates and calculations box, and save changes. This will add a new tab called Tax.
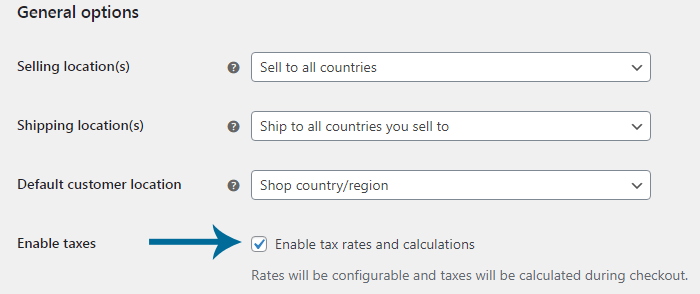
Go to the Tax tab from the top menu (on the accessed page) to configure the tax options.
An important option, Prices Entered With Tax allows you to choose whether you want to enter prices inclusive of tax or exclusive of tax.
There’re two more important options: Display prices in the shop and Display prices during cart and checkout. They allow you to choose whether you want to show prices including or excluding tax in the shop, cart, and checkout.
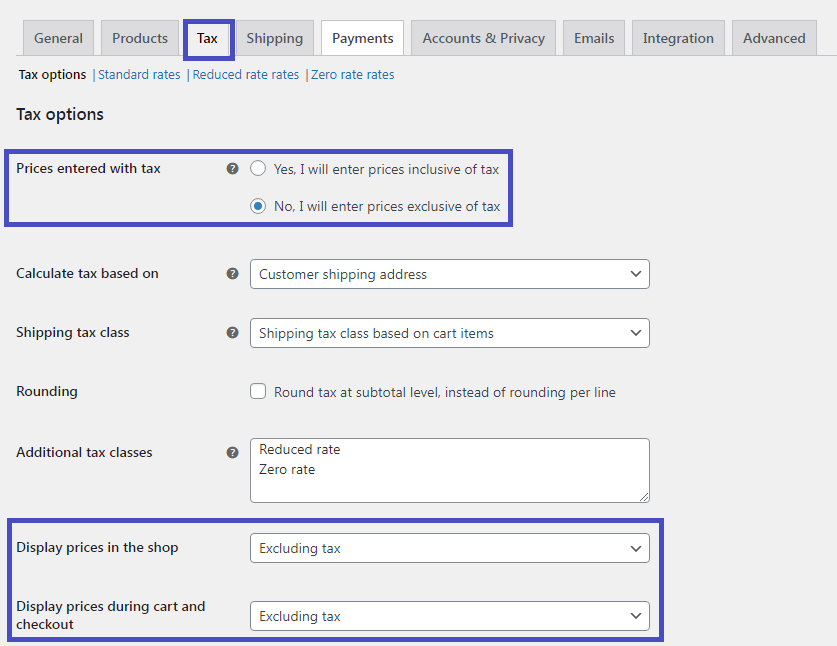
Once you’ve configured them according to your needs, click on the Save Changes button to live the changes. Now your online store is ready to collect taxes.
Congrats! You’ve successfully configured the WooCommerce plugin.
#5. Add A New Product to Your Store
We’ve installed and configured the WooCommerce plugin, now it’s time to add products to our online store.
If you have ever created a post or page in WordPress, then it will be easier for you to add products to your online store.
Let’s add a new product to our online store.
Follow Products > Add New to upload a new product to your online store. In the expended interface, enter the following product details.
Enter the Product Name and Description
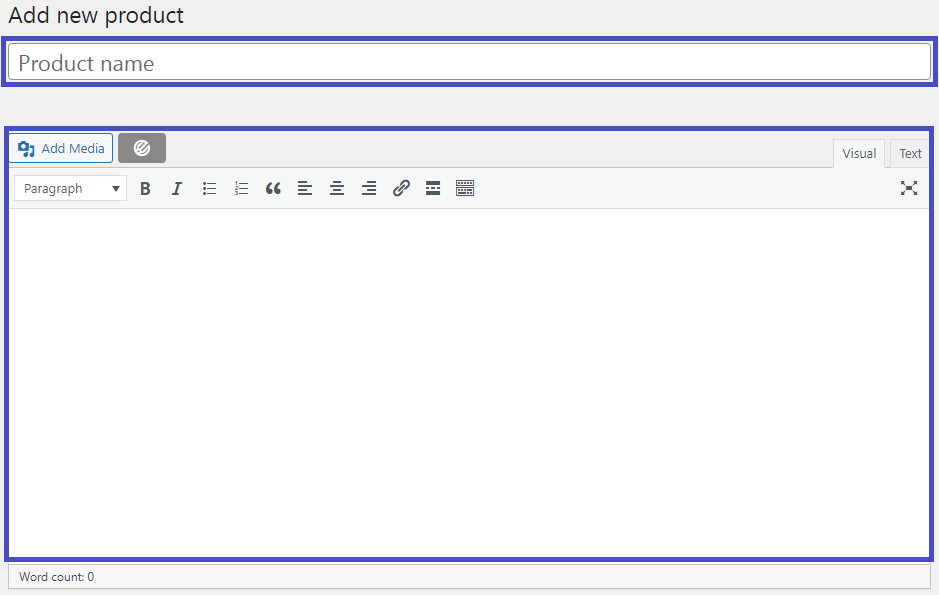
Add your product title in the Product Name section and a detailed description that explains the features and benefits of the product.
You should also use the bullet points in the description which even better explain the product and improve the section’s readability.
Keep in mind that enter your target keyword in the title and description to receive the traffic from search results. You should also include long-tail and semantic keywords in the description to improve your search engine ranking.
Choose The Product Type

Choose the product type you are selling. WooCommerce allows you to choose from different product types as listed below.
- Simple Product: A simple product is the most common type of physical product that you may have to ship to customers like a t-shirt.
- Grouped Product: It’s the combination of multip standalone products that are presented as a group,
- External or Affiliate Product: It’s not your own product but it’s displayed on your store to promote it.
- Variable Product: This is a product that has a set of variations or options like a t-shirt in different sizes and colors.
Additionally, there’re two more options.
- Virtual: Choose this one if your digital product doesn’t require a shipment.
- Downloadable: Use this option if your store gives access to a file upon purchase.
Fill Out the Product Data Meta Box
There’re a few tabs that ask for your product details.
Tab 1: General
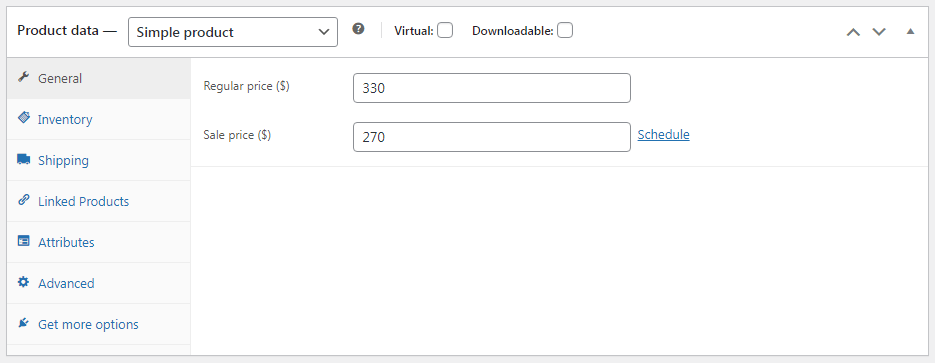
In the General tab, enter the regular and sale price of the product. Customers will see the regular price until you run a discount campaign.
Tab 2: Inventory
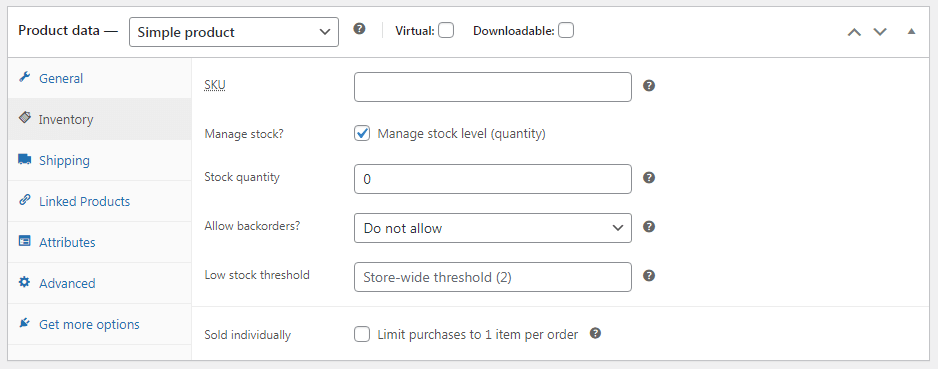
This tab allows you to enter the SKU code and stock quantity of the product to effectively manage the stock.
SKU (Stock Keeping Unit) is a unique ID that you can assign a product to arrange inventory in your online store. You can also use the WooCommerce Product SKU Generator plugin to generate automatic SKU codes or set them manually.
Enabling the Manage stock level (quantity) option allows the WooCommerce stock management system to automatically display the product quantity. You just have to enter the product quantity that will update automatically and also add the low stock threshold.
Tab 3: Shipping
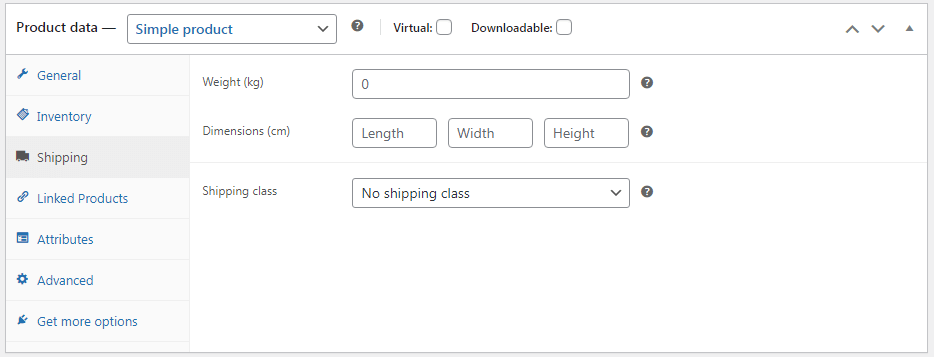
The Shipping tab allows you to add essential product details for shipping. You can add the weight and dimensions of the product.
Tab #4: Linked Products
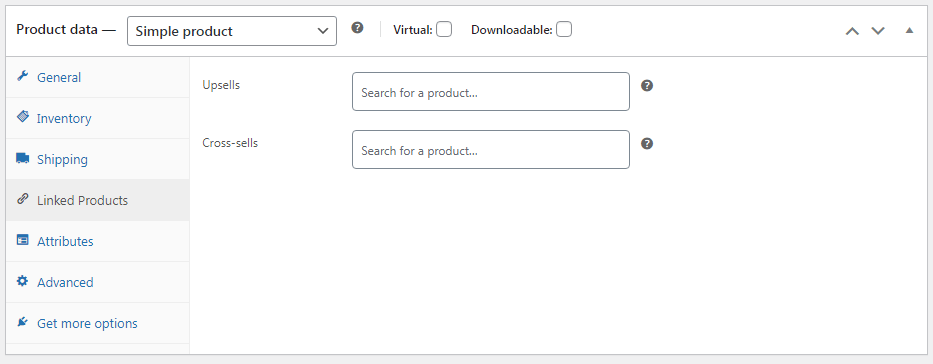
This tab lets you add linked products to this product. This will help you to generate more revenue through cross-sells and upsells.
Tab #5: Attributes
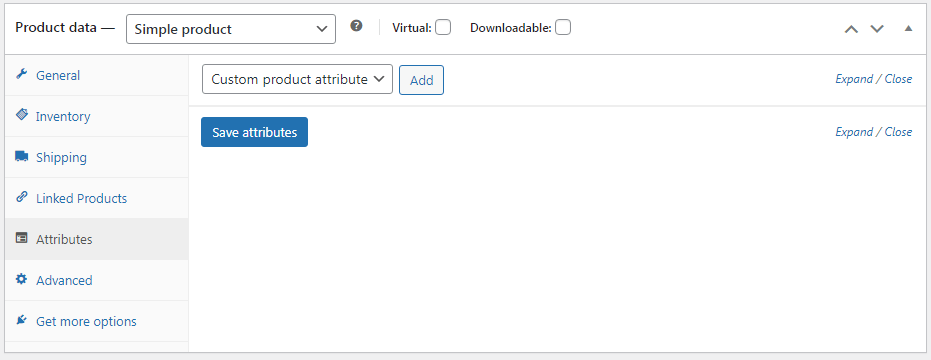
If your product has variations (it means your product is available in different sizes or colors), you can add all of them in this section. This depends on the variations your product has.
Tab #5: Advanced
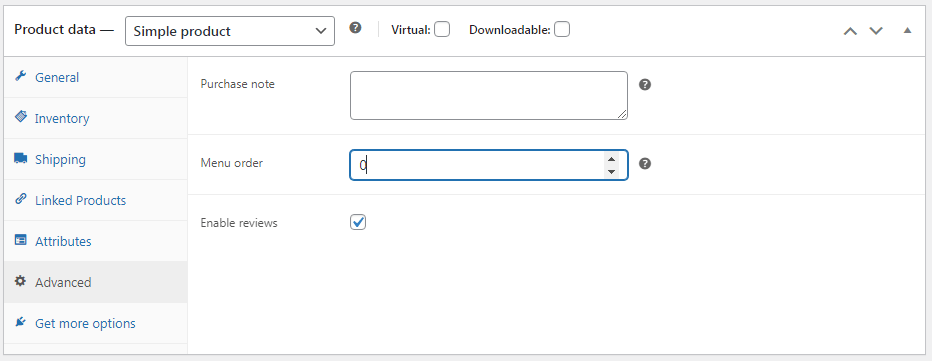
This table allows you to add a purchase note that will display when a customer purchases the product. Additionally, you can select the product’s ordering position and check the box to enable reviews.
Add A Short Description
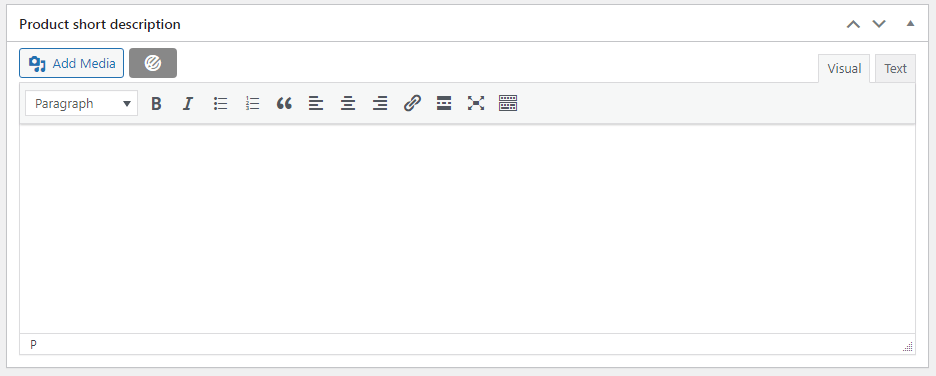
Scroll down to the product short description box and type about 150 characters which is more SEO-friendly.
Add Categories and Tags
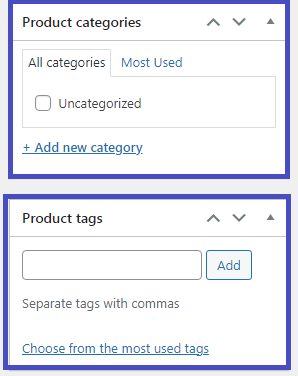
On the right-hand side, add the product category and tags, so they’ll help your customers easily browse your online store and quickly find the products they are looking for.
Add Product Image and Gallery
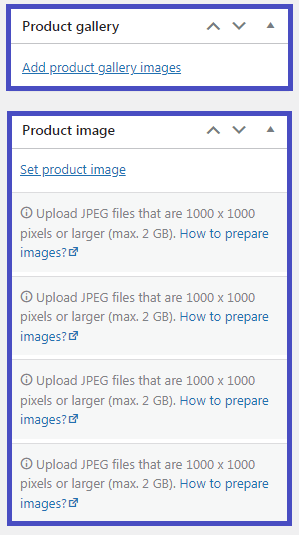
On the right sidebar, add the product image that will appear in the shop and on the single product page. You should also add more product images that will display on the single product page.
Once you’ve entered the correct details, just click on the publish button to get live your new product. Now customers can purchase your product.
Congrats! You’ve added your first product to your online store.
And repeat the same method to upload more products to your online store.
#6. Select and Customize the WordPress Theme
The theme modifies the overall appearance and design of your online store. This also makes or breaks your website and affects the user experience. Make sure your theme is responsive, fast, mobile-friendly, and has many responsive templates.
By default, the Storefront theme is installed on your website but you need to change it to the Astra theme.
Astra theme (powered by Brainstorm Force) is the popular and fastest-loading Woocommerce theme. This has been downloaded more than 1 million times and has 5-star rating.
Astra theme improves every segment of the WooCommerce section such as the shop page, single product page, cart page, checkout page, thank you page, my account page, and everything in between.
The reason that makes standout the Astra theme is it works effectively with page builders such as Elementor, Divi Builder, WPBakery Page Builder, Gutenberg, Beaver Builder, Thrive Architect, and Brizy.
Follow Appearance > Theme and deactivate your current theme. Then click on Add New button on the theme page and enter the Astra in the search field.
Click on the Install button and then Activate button next to the Astra listing to make live the theme on your website.

You can also use its pre-built designs by installing the Astra Starter Sites WordPress plugin.
#7. Extend Your Store Functionalities Using Plugins
Now your online store is almost ready to sell products. You may also want to add more functionalities and features to your store using plugins.
There are over 59,000 plugins in the WordPress.org directory which makes it difficult to choose the essential plugins.
Here’re our top picks for essential plugins that you should install on your online store.
#1. OptinMonster
OptinMonster helps you convert your website visitors into customers, subscribers, and leads. The plugin comes with countdown timers, lightbox popups, sticky header and footer banners, spin to win, and much more.
#2. Advanced Coupons
Advanced Coupons plugin extends the WooCommerce coupon functionality. The plugin includes Buy One Get One deals, gift cards, auto-apply coupons when cart conditions match, URL coupons, shipping discounts, and much more.
#3. HubSpot
HubSpot is the best CRM (Customer Relationship Management) WordPress plugin. The plugin comes with free forms, live chat, contact management, email marketing, and analytics. This helps you convert your site visitors into potential leads.
#4. WPForms
WPForms is the best WordPress form builder plugin that allows you to create contact forms, payment forms, survey forms, registration forms, and newsletter forms within a few minutes. The plugin has 400+ templates and drag-and-drop functionality, so you just need to point and click to create forms.
#5. CartFlows
CartFlows is the best WordPress sales funnel builder that boosts your conversion rate and maximizes your profits. This comes with WordPress funnel builder, one-click upsells, one-click order bumps, dynamic offers, checkout form layouts, and many templates for everything.
So, install the recommended plugins to increase conversions and generate more revenue.
Test Your Online Store
Finally, make sure to check your online store and its functionalities whether they work or not.
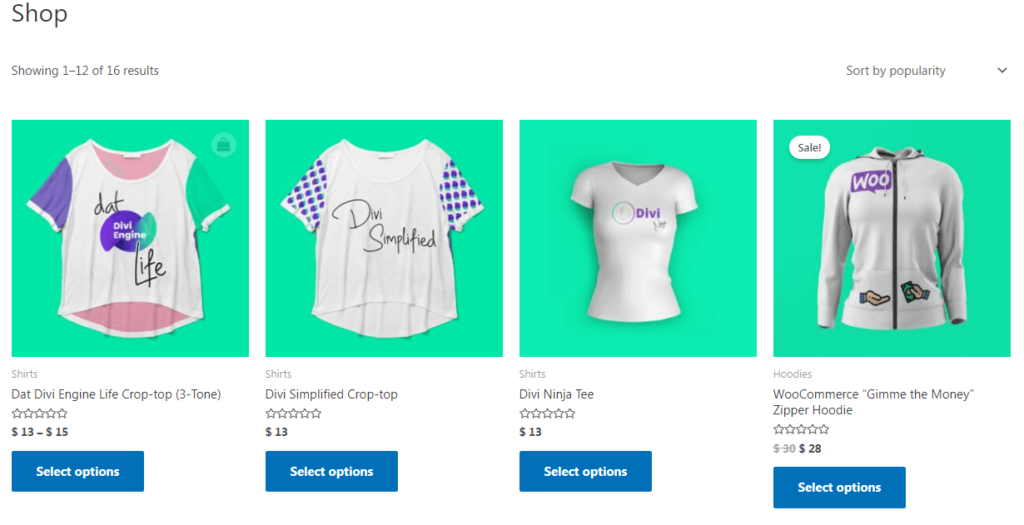
I’ve added a product manually to our store and also imported many products. Here’s what our online store looks like.
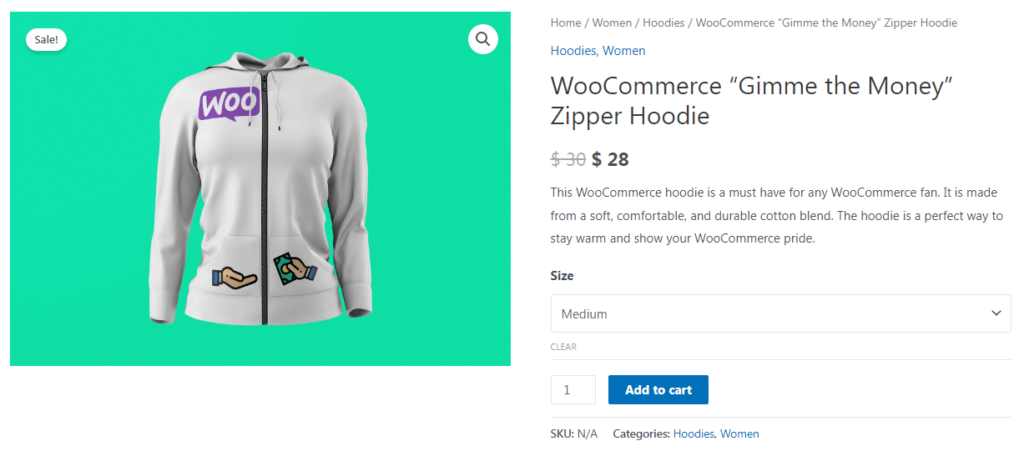
Take a look at the single product page.
The shopping cart also works efficiently. Here’s what the shopping cart looks like.
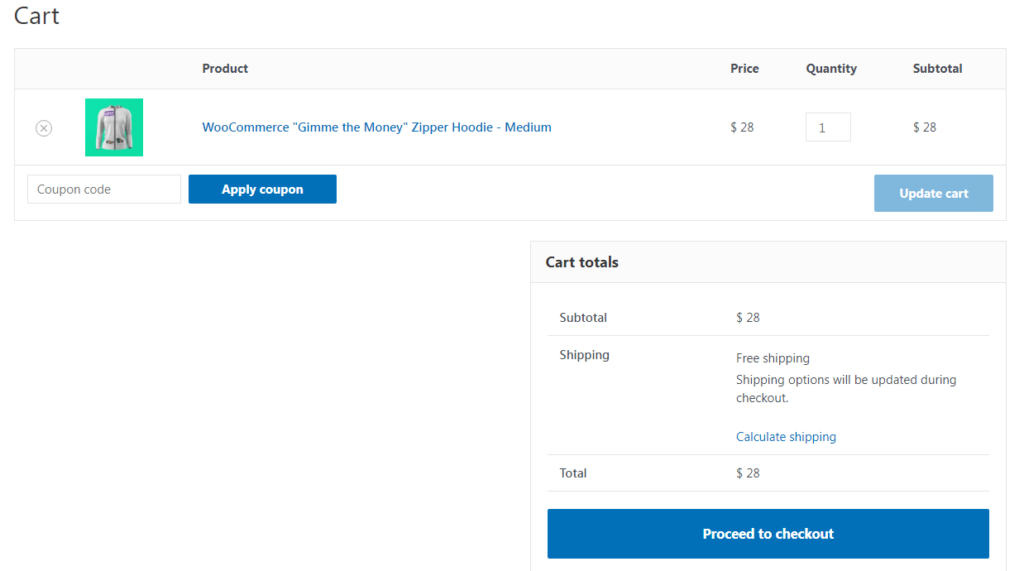
Once a customer clicks on Proceed to checkout button, it will ask for billing information. Take a look at the checkout page.
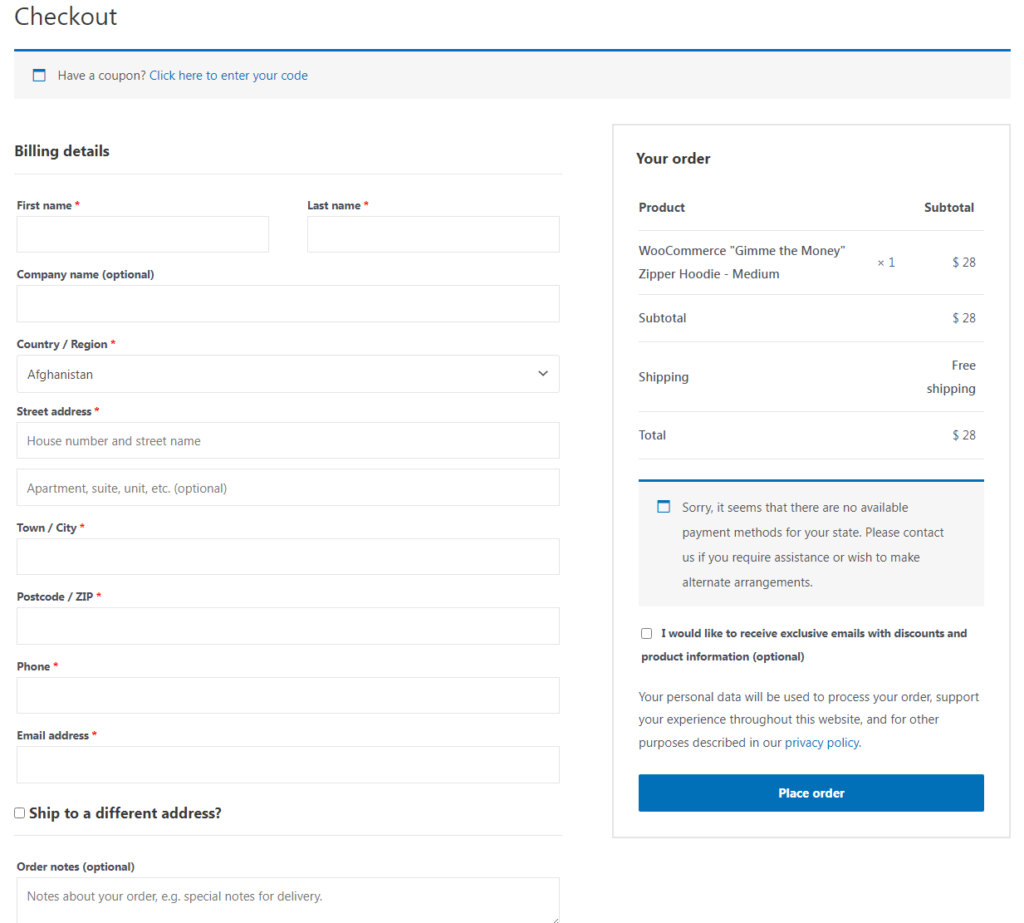
So everything works perfectly. This means we’ve successfully built our online store with WordPress in less than 1 hour.
Conclusion
Building an online store with WordPress is cheaper and easier as it costs a few dollars a month and takes less than 1 hour.
Starting an online store requires a domain name, web hosting, and time. Once you have them, you can easily build your desired online store with WordPress and WooCommerce.
I hope you found useful our blog on how to build an online store with WordPress in less than 1 hour.

