Want to learn how to hide the WordPress login page with and without using a plugin, then you have come to the right place. Keep reading on.
We all know that WordPress powers over 40% of the web, thus, it’s a popular target for hackers and malicious attacks.
A common hacking method is called brute force attacks. Hackers use this method to discover a correct password by systemically entering every possible password until they find the correct one that works.
So all website owners need to install a solid security system like iThemes Security PRO that protects their websites against all known attacks using the best security practices.
One of the best security practices is hiding the WordPress login page. This will help you to keep hackers and bots away from accessing your WordPress login page.
Table of Contents
Why Hide the WordPress Login Page?
Everyone knows how to access the WordPress login page, they just add /wp-admin or /wp-login.php at the end of the domain name to reach the WordPress login page. Then, they guess your username and password to break into your WordPress website.
I highly recommend you hide the WordPress login page because there’re many reasons to obscure it.
#1. Unauthorized Users Wouldn't Even Know Wether Your Login Page Exists or Not
Once you’ve hidden the WordPress login page, no one even knows whether your WordPress login page exists or not. Because when they enter wp-admin or wp-login.php at the end of your domain, they’ll be redirected to the specified page.
#2. Attackers and Bots Wouldn't Access Your WordPress Login Page
If hackers know that your website is powered by WordPress, they still can’t access your WordPress login page. Because they don’t know about your WordPress login page’s unique URL structure.
Hiding the WordPress login page will help you to keep away all attackers from accessing your WordPress login page. Hence, you’ll slow down the significant amount of attackers and bots.
#3. Save Your Website's Resources
Once a user tries to log in to your WordPress website, it consumes your website’s resources. Picture this, many attackers attempt to log in to your website every day, so they consume a portion of your hosting resources. Thus, hiding the WordPress login page saves your site’s resources.
#4. You'll Get Peace of Mind
Once you’ve hidden the WordPress Login page, you’ll get peace of mind knowing that no one can guess your login page’s URL structure to make a hack attempt.
How to Hide the WordPress Login Page?

I will show you 2 easy methods to efficiently hide the WordPress login page.
- Hiding the WordPress login page with a plugin
- Hiding the WordPress login page without using a plugin
Let’s get started.
Method #1: How to Hide Your WordPress Login Paga with a Plugin?
You have to install and activate the iThemes Security plugin because it allows you to easily hide the WordPress login page free of cost as well as enables you to implement other best security practices.
Why Do I Recommend iThemes Security Plugin?
Keep in mind hiding the WordPress login page won’t prevent hacking completely. This means installing a solid security system and following best security practices is crucial to protect your website.
iThemes Security plugin is a better WordPress security plugin. This allows you to secure your WordPress site using 30-way.
Quick Note: The iThemes Security plugin FREE version is enough to hide the WordPress login page and implement basic security features. But for the advanced security features, you need to install the iThemes Security PRO plugin (premium version).
Read More: iThemes Security PRO Review: Is It the Best Security Plugin?
Let’s hide the WordPress login page with the iThemes Security plugin.
Quick Note: Create a backup of your website before making any changes. So you’ll be able to revert your website to its original state if something happens wrong.
Step #1. Install And Activate iThemes Security Plugin
Navigate to the Plugins >> Add New from the left sidebar in the WordPress admin dashboard.
Enter iThemes Security in the Search Plugins section, so you’ll quickly find the iThemes Security plugin. Simply click the Install Now button and then Activate button next to the iThemes Security listing.

Step #2. Locate the "Hide Backend" Option
Once you’ve installed and activated the plugin. a new option called Security will be added to the left sidebar menu.
Visit Security > Settings, as you’ve installed the plugin for the first time, it recommends you run the setup wizard. The setup wizard is recommended however you can skip it.
For now, we just focus on hiding the WordPress login page.
When you’ve run the setup wizard, go to Security > Settings > Advanced > Hide Backend.
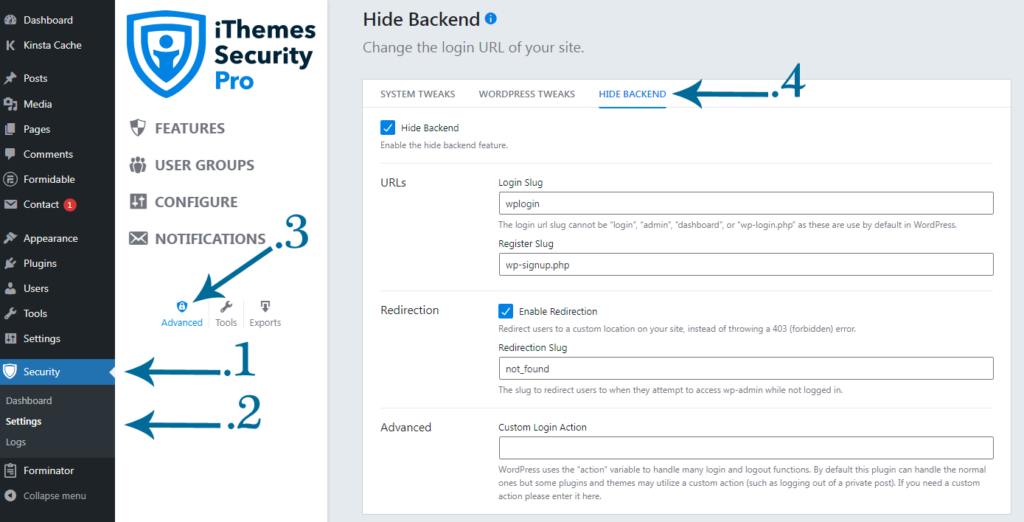
Step #3. Add New Login URL Structure
Firstly, check the Hide Backend box to enable the feature.
Then enter your new URL slug in the Login Slug field. Make sure your new login URL is unique and difficult to guess
I’ve entered omn-059-gti as the new WordPress login URL slug which is hard to guess. This means that next time, I’ll navigate to mywebsite.com/omn-059-gti to access my WordPress login page.

Quick Note: Make sure to save your new login URL in a file. This will come in handy when you’ve forgotten your new login slug.
Step #4. Add A Specific Redirect URL Slug
One more important option is to redirect the users who try to access wp-admin while not logged in. You just have to enter the URL slug of one of your webpage where you want to send the users in the Redirection Slug field.

Finally, click on the Save button to make changes live.
Now it’s ensured that no one can access your WordPress login page until they discover your new login URL slug.
Step #5. Test Out Your New Login URL
When I want to log into my WordPress website, I’ll have to visit mywebsite.com/omn-059-gti to access my WordPress login page.
When a user attempts to access wp-admin while not logged in, they’ll be redirected to my specified page.
Now let’s learn the second method.
Method #2: How to Hide Your WordPress Login Page Without a Plugin?
If you’d like to change your WordPress login URL and hide the WordPress login page without using a plugin, all you need to access your website’s files using cPanel or FTP.
Step #1. Download wp-login.php File
By default, the wp-login.php file includes all the code that creates the WordPress login page and handles the login sequence.
Firstly, you need to download the wp-login.php file to ensure if something happens wrong with the new PHP login file, you would replace it with the downloaded wp-login.php file and then everything will work normally.
To download the wp-login.php file, let’s locate the file in cPanel.
Log in to your hosting cPanel and then scroll down to the Files heading. Click on the “File Manager” under the Files heading, this will bring you to your website files.

Click on the “public-html” folder from the left sidebar.
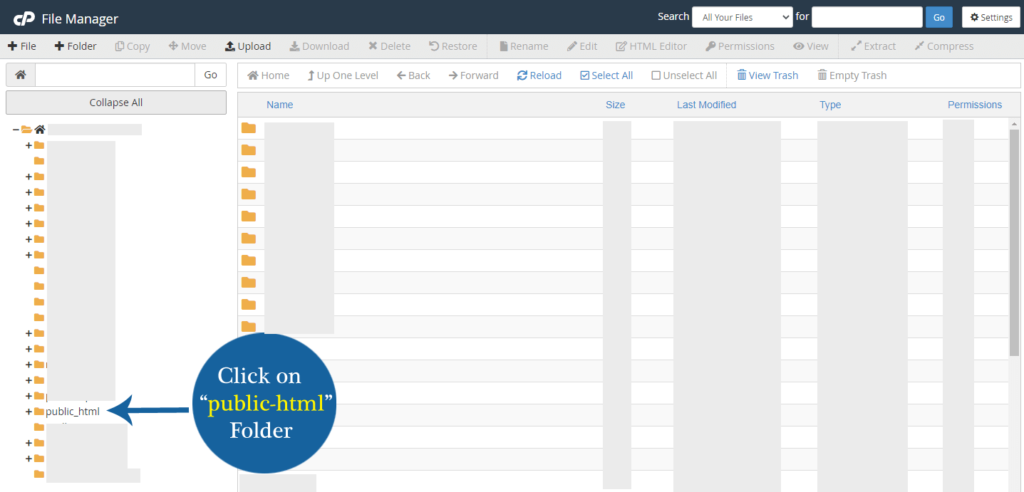
Scroll down to locate the wp-login.php file. Once you’ve located it, quickly click on the file twice to download it.

Once you quickly click it twice, it will start downloading. The file will be downloaded in a few moments. Next, store the file in a safe place.
Step #2. Create a New File
You can create a new file directly in cPanel or Notepad. For this example, I will directly create a new file in cPanel.
Click on the New File button from the top menu on the recently accessed page.

Once you click it, you’ll have to enter the new file name. Name this file whatever you want your new login URL to be. For this example, I’ve named it bksg-nmd.php. Make sure that your login URL is hard to guess.
Click on the Create New File button to move on.
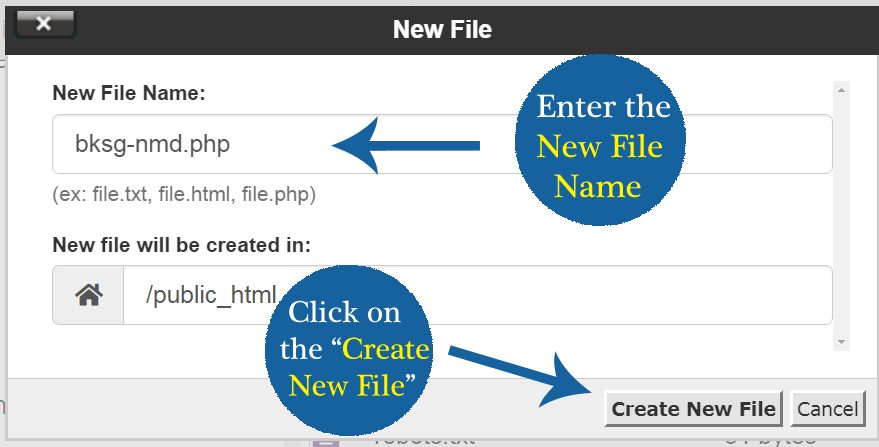
So a new file will be added. Just click on the created new file, then click on the Edit button from the top menu, and again click on the Edit button in the popup to add the code.

Step #3. Copy and Paste the Code
Open the wp-login.php file, select all the code, and copy it into your created new file. Don’t forget to save it.
You can open up the file by selecting it and then clicking on the Edit button from the top menu.
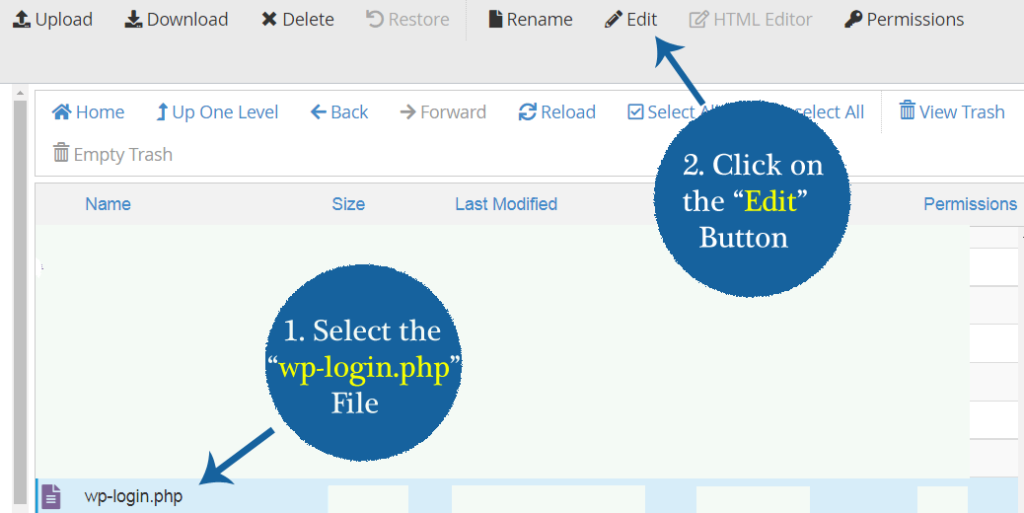
Step #4. Replace Every Instance of “wp-login.php”
Next, find every instance of “wp-login.php” in the new file and replace it with your new file name. cPanel code editor has a find and replace function that I can use to find every instance of “wp-login.php” and replace it.
- In the new file, press Ctrl + F simultaneously, so there will open a box that looks like a search bar.
- Enter “wp-login.php” in the search bar, then click the plus sign “+” just below the search bar.
- Next, add your new file name (bksg-nmd.php) in the Replace with section.
- Now click on the “All” button to replace them at once.
- Once you’ve done this, make sure to save changes.

Now you have created the new PHP login file.
Step #5. Delete the wp-login.php File
Now delete the wp-login.php file. Don’t worry, you will still have your site backup if something happens wrong.
To delete the file, select the wp-login.php file in the public-html folder and click on the Delete button from the top menu.
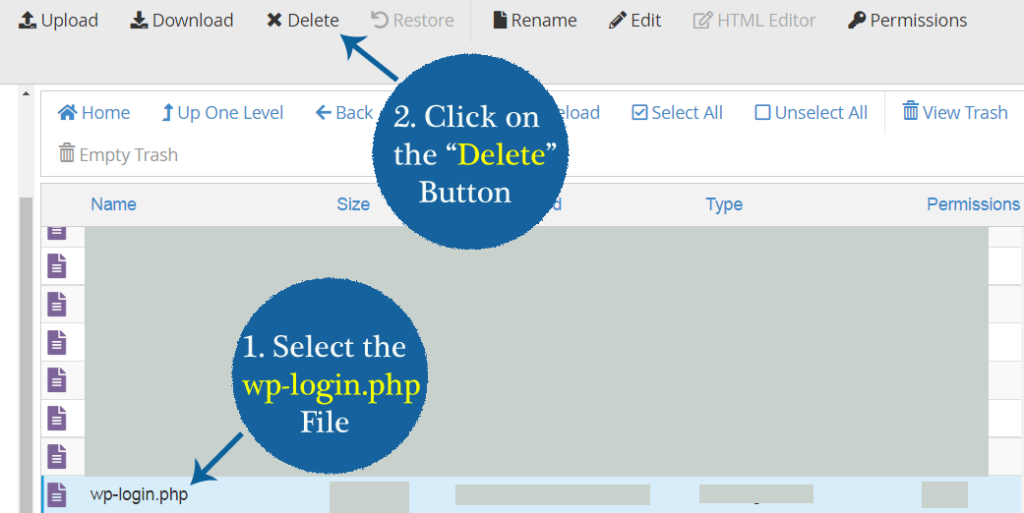
Next, there will be appeared a popup that asks Are you sure you want to move the following file to the trash? Just click on the Confirm button.
Step #6. Test Out Your New Login URL
Now you can log into your WordPress website by navigating to your new login URL. In my case it’s mywebsite.com/bksg-nmd.php.
If a user tries to access the login page by navigating to wp-admin or wp-login.php, they’ll be redirected to the 404 not-found page.
Quick Note: This method works but if something happens wrong with the new PHP login file or this creates a performance issue, then delete the new file and upload the wp-login.php file (that you’ve downloaded earlier). This will replace the login URL with wp-admin.
I recommend using the iThemes Security plugin to hide the WordPress login page.
Conclusion
There are many ways to hide the WordPress login page such as by using a plugin and without using a plugin. Hiding your WordPress login page adds an extra layer of security, keeps attackers away from accessing the login page, and saves your website resources.
Additionally, make sure you follow the best security practices to protect your WordPress website against attacks.
I hope you found useful our guide on how to obscure your site’s login page.


